

Howdy, Stranger!
It looks like you're new here. If you want to get involved, click one of these buttons!
Categories
- 241.3K All Categories
- 22 >> Start Here <<
- 12 New Members
- 8 FAQs
- 86.5K Gear
- 39.5K Guitar
- 3.4K Acoustics
- 1.3K Bass
- 14.6K Amps
- 17.2K FX
- 265 Digital & Modelling
- 765 Other Instruments
- 8.2K Making & Modding
- 419 Gear Reviews
- 107 Guitar Reviews
- 73 Amp Reviews
- 118 FX Reviews
- 87 Other Reviews
- 748 Made in the UK
- 972 Theory
- 1.8K Technique
- 2.1K Live
- 3.2K Studio & Recording
- 2.1K Making Music
- 218 Events
- 15 Guitar Show 2018
- 829 Plug My Stuff
- 105K Classifieds
- 41K Guitars £
- 2.8K Acoustics £
- 138 LH Guitars £
- 894 Basses £
- 10.5K Parts £
- 18.3K Amps £
- 34K FX £
- 2.8K Studio & Rec £
- 6.1K Misc £
- 465 Personnel
- 54.6K Chat
- 36.5K Off Topic
- 1.1K Tributes
- 6.6K Music
In this Discussion
Become a Subscriber!
Subscribe to our Patreon, and get image uploads with no ads on the site!
My first build(s): MJT content.
 redrighthand
Frets: 746
redrighthand
Frets: 746
So, a couple of months back I completed a few partscaster builds, using components from a variety of sources, including MJT, Allparts, Warmoth, Musikraft and Axesrus.
I was completely new to the guitar assembly process when I did it, and did it with little investment in tools, and with the aim of doing as much myself - and leaving only the minimum to a professional.
So I thought I'd put together a little summary of what I built, and, importantly, what I learned when building them.
Hope this is interesting, or that you just like the pics. ") If anyone has any questions feel free to shout - though I reckon you lot know a shitload more than me about all this so I'm not expecting any!
If anyone has any questions feel free to shout - though I reckon you lot know a shitload more than me about all this so I'm not expecting any!
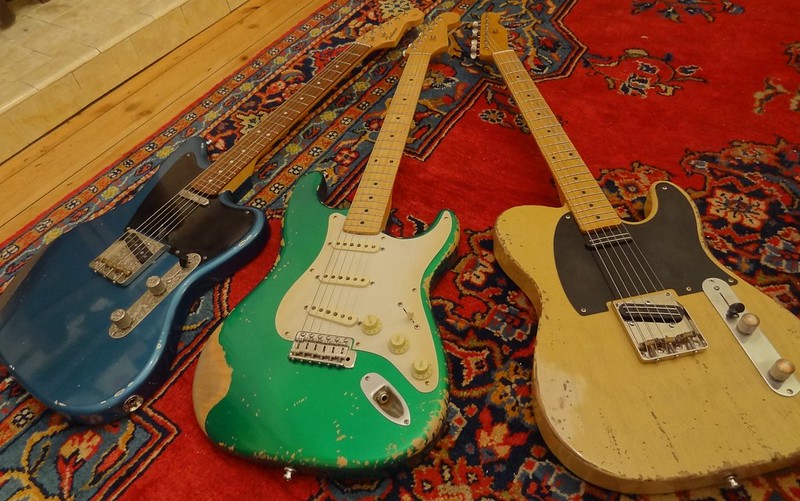
Before we start, here are the finished items. Relic haters be warned: you might end up changing your minds ")
0 LOL 3
LOL 3 Wow! 0
 Wisdom
LOL 3 Wow! 0 Wisdom Base theme by DesignModo & ported to Powered by Vanilla by Chris Ireland, modified by the "theFB" team.
Comments
Isn't she lovely.
The hardware on this is by a company called El Dorado, who specialise in engraved hardware and pickguards. I had tried their stuff on a couple of guitars before and always found it a bit too over the top. I think it goes really well on this though. The fact that the engraving takes away the shininess also makes it sit well on the reliced body.
(to be continued in next post...)
Sounds wise I can't get enough of this right now. The bridge pickup is classic tele stuff. Not quite as great as the Lollar 52 in the tele I sold on here a while back but for me there's very little in it. The neck is surprisingly good - clearer sounding than on the the 52 tele I had, and I'm guessing the wiring has something to do with that.
The two extra positions give you the neck pickup through a capacitor which cuts some of the bass, and the neck and bridge pickups together out of phase. I'm not totally bought on the bass cut neck option just yet, as I have the perception of a little volume drop too (though I do need to play with pickup height a little), however the out of phase option sounds lovely, very sparkly when driven.
I have noticed that that the pots are stiffer than I'm used to. The upside is less chance of accidental changes. The downside is that violining would be difficult. Then again when do I ever violin...!
In terms of general feel this guitar reminds me of the Gibson custom shop non reverse firebird I had until last year. A combination of the fat neck, light weight and layout/offset body. The bonus is that I prefer the tele pickups to the Gibbo's P90s, plus this one, being a bolt on necked relic, is one that I need to worry much less about scratching / damaging, plus it was quite a bit cheaper than the Gibson.
After having had a new bone nut, fret level and setup by Fraser Callum, I'm very very happy with this one!
Here are the specs:
I'd never really liked relics, either the idea or the execution, until I saw a Fender candy apple green relic Strat advertised on here one day. Something about that finished just really appealed. Of course because it was about £1.5k second hand I did no more than admire it from a distance. Candy apple green stuck in my head however, so when I chanced on a similar MJT body I jumped on it. And so now I've made my own:
Unfortunately the attention to detail given to the frets was not given to the drilling of screw holes. So while the old partscaster seemed just fine, when I came to try to screw this neck onto the strat body, and the screws kept going in at an angle, I realised that all the screw holes were out of line. So, rather than botch the job myself, I got Fraser Callum to plug the holes (which he did properly, making sure to get the grain direction right, etc) and drill some new ones. Feel wise the neck reminds me of an AVRI 57 reissue strat I used to have (lovely thing). Initially I wasn't sure this neck was fat enough for me, but the more I play it the more I am loving it.
The pickups on here are from Mojopickups - their 54 - 56 model I believe. These also remind me of that 57 reissue, and that's all good because that 57 reissue was one of the nicest sounding guitars I've had. I'm very happy with these pickups.
The wiring loom and switch/pots are from a fender roadworn, as is the pickguard, pickup covers, knobs and jack plate.
The trem is a Callaham. I must say while it clearly a quality unit in terms of how it looks and feels, though how/whether it impacts tone I don't know. They are said to make things brighter, and certainly the pickups do sound brighter than I remember from the last guitar they were one, but I may just be misremembering. I do need to play with the setup of the bridge. I much prefer a trem which is easy to depress, yet like the unit flat against the body rather than floating (I never pull up, plus palm mute a lot and that can be trickier with a floating trem). I haven't managed to get it set up in this way yet - and suspect the answer may be a block of wood behind the block. Need to keep experimenting. And experimenting is fun.
Formerly TheGuitarWeasel ... Oil City Pickups ... Oil City Blog 7 String.org profile and message
So this is another MJT body, and the neck is an Allparts neck reliced by MJT.
I am a fan of the back-to-basics nature of the tele - and this one says "slab of wood" more than any I've played. I think it's the worn finish on body and neck, combined with that big fat neck, that are doing this for me.
Like the Telemaster, this had a bone nut made by Fraser, and those few errant frets levelled. And again I'm a very happy bunny with this'un.
Here are the specs:
So, I found this experience to be great fun. So much so that as I waited for the guitars to have their final setup I started to get a bit worried that the fun might be over. (Thankfully this nonsense disappeared from my mind once I realised what a hoot they are to play.) For me this was part of the whole build. I didn't do this out of need, desperation or boredom or anything else, I simply thought it would be a fun thing to do.
It did take me a while, though a large part of that was due to my son being born during the process. Things had to go on hold for a bit. On the flip side, hopefully one of these will be his some day.
TOOLS
1. A few screwdrivers, pliers and sandpaper from the toolbox. Cost £0. (Already in the toolbox.)
2. A cheap Draper dremel-style drill/grinder kit as shown in the pic above. Cost £0. (Already in the toolbox though they're only about £25, and the one I got even came with a few small drill bits, perfect (enough) for everything I needed to drill.) Used for drilling all but strat trem claw holes and for making a file for the neck (see below).
3. A standard power drill. Cost £0. (Already in the toolbox.) Used for drilling strat trem claw holes.
4. Drill bit extender. One of these:
http://www.screwfix.com/p/flat-bit-300mm-extension/16769?_requestid=335709 ;
Cost £2.39 collected. Used for drilling strat trem claw holes.
5. Flexible screwdriver bit extender. Cost £0. (Already in the toolbox.) Used for screwing strat trem claw screws and earth screw deep in telemaster control cavity.
6. Cheap needle file set. Cost £6.85. These: http://www.amazon.co.uk/gp/aw/d/B0001K9TK6 Used for making holes for ferrules slightly larger, filing down dowel ends (see below!), and making....
7. Homemade fret file. I took one of the needle files above and with a grinding attachment on the dremel-alike I ground down one end of the file so it was totally smooth, meaning it wouldn't damage the fretboard when I was filing the fret ends. Thanks to JCA2550 for this tip in this thread (on another forum I used to frequent): http://forum.musicradar.com/showthread.php?125321-Rounding-of-fret-edges
Cost of tools: £9.24!
DRILLING PICKGUARD HOLES
So this was something I thought would be easy. Just lay everything out, mark the holes, drill, and screw it all together… right? Oh fuck no.
My first attempt was on the telemaster. I lined everything up (pickguard with neck pickup and neck and control plate and centred around bridge), marked and drilled then went to screw and... Wtf? The pickguard holes were no longer lined up with the screw holes. I soon found a better approach for drilling the pick guard holes, namely to drill the first hole, screw the pick guard on, then drill the next hole using the pickguard holes as a guide, being careful not to damage the pick guard.
1. Get some cocktail sticks, wood glue, tissue/cloth, snips and needle file with pointy-ish (technical term) end.
2. Break off very tip of cocktail stick (pointy bit) unless you favour the tonal qualities of minuscule little chambers.
3. Dip cocktail stick in wood glue.
4. Insert cocktail stick in hole.
5. Snip off protruding end (or just break it off if you like to live dangerously).
6. Wipe away excess glue (watch the finish!)
7. File down any rough ends with the needle file for precision.
8. Allow to dry if you plan to drill near it.
Well that was my method anyhow.
DRILLING TELE NECK PICKUP HOLES
Now this was a right royal pain in the arse. The pickup screws into the body, but must line up with a pickguard which can't be on when you're marking the holes, which itself needs to align with a neck, bridge and control plate. I found that using lots of little pieces of cardboard to wedge the pickup in position and identify the correct location, before marking and drilling holes, was useful, but not foolproof. So the cocktail sticks came in handy here too.... I'd say if you want to do this and drill right first time, just take your time over it and get the pickup wedged in absolutely the right position before marking and drilling the holes. Just check and check again before drilling.
GETTING NECKS TO FIT
So, having naively assumed that a strat body and strat neck, and a tele body and tele neck, would slot together with no hassle, here's what I found:
- a strat neck that was too big for a strat neck pocket
- a strat neck that fitted perfectly but had the holes in the wrong place
- a tele neck that fitted one tele body but not the other
In the end all worked out ok, but a little but of work was required, namely:
- getting a luthier to plug and redrill the musikraft neck holes due to the existing holes having been drilled by a mad man
- very very lightly sanding the sides of the warmoth neck.
The latter was interesting. Initially the warmoth neck was going on the strat body. However it didn't fit. Looking at it, it looked like a fair bit of wood might need to be sanded off either neck or body. However having done a bit of net research, I decided to very very slowly and gently sand the neck. Lo and behold after only a tiny bit of sanding (so little that its hard to see where much finish actually came off), it slotted in perfectly. The moral being: go very slowly!
(continued in next post...)
I got some good advice online for this too. To drill the holes properly you need to go in at a very shallow angle. This means you'll need a very long thin drill bit. Going by the US forums, these seem to be 10 a penny across the pond. Over here they aren't so common, and so are pricey. However after quite a bit of searching I found this drill bit extender for sale at Screwfix for £2.39. Job done (just about).
Not much to say on this other than I thought I would completely balls up removing/installing pickups, and in fact it was fairly easy, mainly because most of the connections on the switches/pots have a little hole where you can hook the wire on before soldering, leaving you with both hands free. So if you haven't tried this before - it might not be as bad as you think!