

Howdy, Stranger!
It looks like you're new here. If you want to get involved, click one of these buttons!
Categories
- 241.3K All Categories
- 22 >> Start Here <<
- 12 New Members
- 8 FAQs
- 86.6K Gear
- 39.5K Guitar
- 3.4K Acoustics
- 1.3K Bass
- 14.6K Amps
- 17.2K FX
- 265 Digital & Modelling
- 765 Other Instruments
- 8.2K Making & Modding
- 419 Gear Reviews
- 107 Guitar Reviews
- 73 Amp Reviews
- 118 FX Reviews
- 87 Other Reviews
- 748 Made in the UK
- 972 Theory
- 1.8K Technique
- 2.1K Live
- 3.2K Studio & Recording
- 2.1K Making Music
- 218 Events
- 15 Guitar Show 2018
- 829 Plug My Stuff
- 105K Classifieds
- 41K Guitars £
- 2.8K Acoustics £
- 138 LH Guitars £
- 894 Basses £
- 10.5K Parts £
- 18.3K Amps £
- 34K FX £
- 2.8K Studio & Rec £
- 6.1K Misc £
- 465 Personnel
- 54.6K Chat
- 36.5K Off Topic
- 1.1K Tributes
- 6.6K Music
In this Discussion
Become a Subscriber!
Subscribe to our Patreon, and get image uploads with no ads on the site!
The Bailey BYOG Course - Mar 2008
 TTony
Frets: 27453
TTony
Frets: 27453
I did a few real-time build threads on the old forum. Looks like they've gone forever.
So here's a copy & paste from my (now disused) guitar building blog site of my second visit to Mark Bailey's course back in March 2008.
Thursday, March 20, 2008
Time to Start
Let the build begin!
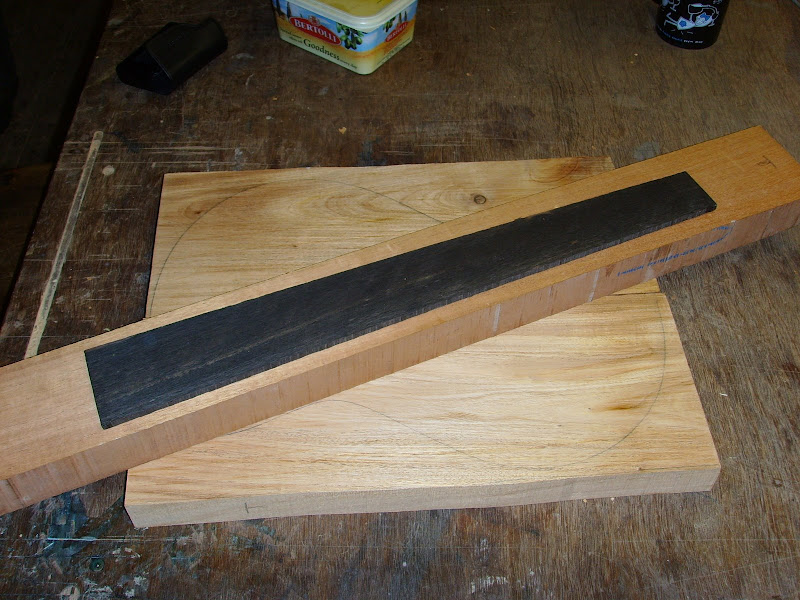
Step 1 is to choose the woods, and do the initial preparation. So here are a few pieces of mahogany (2 pieces to be joined for the body, plus another piece of mahogany for the neck) plus a piece of ebony for the fingerboard. The ebony has an interesting bit of colour variation in it, which doesn't really show up in the photos below ...
Step 1 is to choose the woods, and do the initial preparation. So here are a few pieces of mahogany (2 pieces to be joined for the body, plus another piece of mahogany for the neck) plus a piece of ebony for the fingerboard. The ebony has an interesting bit of colour variation in it, which doesn't really show up in the photos below ...
My original plan was to use a maple cap, but then I saw this in the woodstore. Again, the photo doesn't really do justice to the beauty of the wood, and it's also completely untreated at the moment ... so my expectations are high for the finished cap ...

It's bookmatched Amazique. It's around 12mm thick, so plenty of scope for some carving.
This evening, the body pieces have been thicknessed (down to 38mm), and the neck blank has been sanded and planed. First job tomorrow will be to get the body pieces glued together, and possibly get the cap glued on too.
The build has started !!!
Having trouble posting images here? This might help.
0 LOL 0
LOL 0 Wow! 0
 Wisdom
LOL 0 Wow! 0 Wisdom Base theme by DesignModo & ported to Powered by Vanilla by Chris Ireland, modified by the "theFB" team.
Comments
Thursday, March 20, 2008
I'm not alone ...
Andy will create a Vox teardrop styled guitar, all mahogany with ebony fingerboard, and rubber (so he says) tuners ... that's if he gets his feet away from the log fire and into the workshop ...
Edwin is building another Tele - birdseye maple cap and neck on a mahogany body. This is Edwin's second time on the course, but won't be just his second self-made guitar.
Ton is making a solid mahogany Les Paul - alike ... this course is his surprise "30th" birthday present from his family - I believe him about the birthday present bit, and about it being a surprise ... but maybe they count differently in Holland ;-)
I'll grab some pictures from all 4 builds during the next 5 days, and post them here.
Friday, March 21, 2008
20% Done
20% done - in that we've finished day 1 of 5. And achieved quite a lot of the basic works. The bits of the project that make the difference between an OK guitar, and a great guitar.
We'd got a bit of a headstart today in that we'd picked the pieces of wood, and planed and thicknessed it yesterda, before the course had really begun. So today began with cutting the slot for the truss rod.
Not too difficult a task, once you've measured it accurately, set-up the router properly, and measured it all again, just to make sure. Same approach with the cutting the fretboard slots (measure, set-up, check), made hugely easier and quicker with the table saw jig, which should not be confused with a "table jig saw".
So now we have a neck blank, with truss rod channel cut, and a fretboard roughly radiused with fret slots cut. This was achieved before lunchtime on day 1.
Getting to the stage shown in the next picture took a while ...
Oh no. Working in the Bailey workshop, there is no concept of "good enough" or "near enough" or "that'll do". It's either right, or it's not. And if it's not, then you might spend the next 2-3 hours (or longer if necessary) getting it right. That's why the guitars that come out of Mark's workshop are great guitars rather than just being OK guitars - even if it's one that I've made. And that's why it took 2-3 hours preparing 2 pieces of wood to be joined together.
Whilst all that glue is setting, I'm settling with a beer or two. Apparently today was a fairly short day - into the workshop at 09:30, and out by 20:00. Tomorrow will probably be longer ...
Saturday, March 22, 2008
Day 2 is about the neck ...
By the time we start work in the morning, the cap and the body will be joined and ready for some attention with the bandsaw and a router ...
Sunday, March 23, 2008
Late Update
And this is why there'll be no scratchplate on this body ... would you want to hide any of this beautiful wood? Here's the body, after it spent a few minutes being bandsawn, and then a few more minutes with the router cutting the edge properly.
You can also see the pickup positions routed out, from which you will see that the final decision has been made - the P90 is heading for the neck position.
And finally for today - the neck pocket has been routed, and the neck accurately placed into position - either that or shoved with brute force into the pocket ...
So, this is an interim update, with more to follow later. Probably much later.
The day began here. One body and a pencil ... where shall I carve?
A few hours later, and I'd done some carving. Usually, when sharp tools are brought into contact with wood, the wood suffers. However, this piece of Amazique didn't go quietly, quickly or easily. There are some blunt tools in the workshop, and some aching muscles in my arms.
A few hours later, and we're getting there now, much oh so much more to do ...
Today I probably spent 5-6 hours on the body, and a 2-3 working on the neck. It should all be worthwhile tomorrow when the body gets fitted with the hardware and I do something called "plugging it in".
I forgot to take a pic of the guitar with the finished carved top before I glued the neck in.
And I forgot to take a pic of the guitar with the neck glued in before we stopped ...
So, more photos later this evening when the glue has set - check back later!
The guitar (and neck) are now in the sprayshop, receiving a clear laquered finish. Might get to see it later tonight, or it may be tomorrow morning ...
Tomorrow is day 5 in the 5 day project. The morning will be spent on the frets - levelling and dressing, cleaning and oiling the fretboard, fitting the hardware, setting-up and finally ....
PLUGGING IN !
Tomorrow is the day of big smiles :-)
Monday, March 24, 2008
The sealer coat ...
I think it looks OK ...
Tuesday, March 25, 2008
It's All Over ..
With apologies for the poor photo, this is what it's all been about:
Thursday, March 27, 2008
Final Photos
^:)^
Feedback
^:)^ indeed
Thanks guys - that build was from 2008 (time flies) - and it was my second-ever build.
Guitar weighs a ton and a half, so rarely gets played these days
I found all the posts on a long-forgotten blog that I'd set up, so I could copy & paste them here.
I might try re-creating the detail of #3 build (last September) which was a thru-neck singlecut with added GK3 kit sometime later. I've got all the pics ... you'll just not get the day-by-day excitement of seeing it take shape.
Feedback
Thanks all. I'd like to take all the credit, but most of it is due to Mark Bailey!
Done it !!!!!!!!
(do try to keep up dear boy!)