

Howdy, Stranger!
It looks like you're new here. If you want to get involved, click one of these buttons!
Categories
- 241.3K All Categories
- 22 >> Start Here <<
- 12 New Members
- 8 FAQs
- 86.6K Gear
- 39.5K Guitar
- 3.4K Acoustics
- 1.3K Bass
- 14.6K Amps
- 17.2K FX
- 265 Digital & Modelling
- 765 Other Instruments
- 8.3K Making & Modding
- 420 Gear Reviews
- 107 Guitar Reviews
- 73 Amp Reviews
- 118 FX Reviews
- 87 Other Reviews
- 748 Made in the UK
- 972 Theory
- 1.8K Technique
- 2.1K Live
- 3.2K Studio & Recording
- 2.1K Making Music
- 218 Events
- 15 Guitar Show 2018
- 829 Plug My Stuff
- 105K Classifieds
- 41K Guitars £
- 2.8K Acoustics £
- 138 LH Guitars £
- 895 Basses £
- 10.5K Parts £
- 18.3K Amps £
- 34K FX £
- 2.8K Studio & Rec £
- 6.1K Misc £
- 465 Personnel
- 54.7K Chat
- 36.5K Off Topic
- 1.1K Tributes
- 6.6K Music
In this Discussion
Become a Subscriber!
Subscribe to our Patreon, and get image uploads with no ads on the site!
Combo/Cab remodel diary
 DarnWeight
Frets: 2566
DarnWeight
Frets: 2566
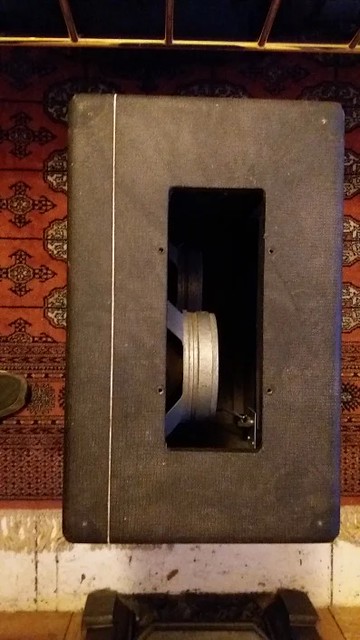
Just thought I'd try and chuck a few photos up here, as and when I remember, of the cab I'm rejigging. It started life as a Simms Watts cab I was kindly given by @knuckleberryfinn of these parts. It's an Ike Isaacs combo, but the amp had been stripped out somewhere along the line, and it had been converted to a compact 2x12 cab. Here's how it was...

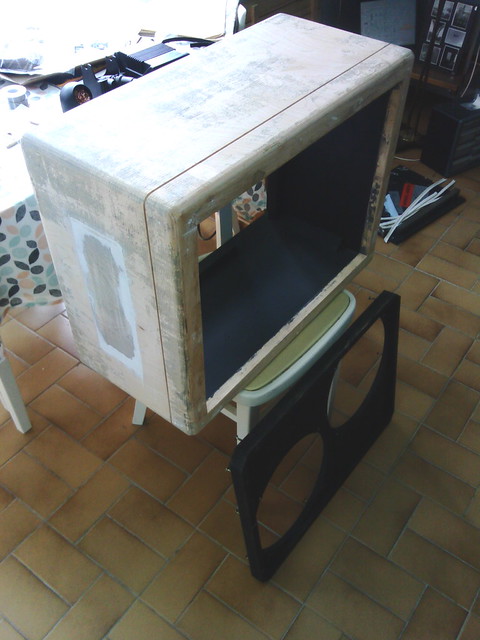
The aim was to build a matching cab for an AC15 head, and already having some nice speakers ready to go (a Fane A90, and a WGS Liberator), this became my "donor" cab. I've since stripped the tolex, patched the opening using a piece of the original baffle, and cut a new baffle for it. Vox tolex, grille cloth and assorted gubbins (handles, piping, corners, etc) have now arrived, so seems a good time to show how it's shaping up before I carry on...

New baffle! T-nuts in, stand-off frame glued on and waiting for cloth. Pretty tight for 2x12 speakers, but they do fit. Baffle is 15mm birch ply, nice quality stuff and thick enough, I reckon.
Cab stripped and sanded, with screw holes and dents all filled. The blue-ish grey stuff is some light residue left from the former tolex/glue, but it's essentially smooth and flat enough to recover as it is now.

Here's the amp opening/slot. The ply "plug" is glued in pace with a larger piece of ply behind it, screwed and glued to the inner surface of the cab. It's solid. Again, used bog-standard filler around the edges/cracks. It might look a bit messy, but it looks dead flat to me. I'm fairly confident it won't peak through the tolex when it's recovered, but time will tell!
More to come as and when I make some progress.
Cheers for reading.
The aim was to build a matching cab for an AC15 head, and already having some nice speakers ready to go (a Fane A90, and a WGS Liberator), this became my "donor" cab. I've since stripped the tolex, patched the opening using a piece of the original baffle, and cut a new baffle for it. Vox tolex, grille cloth and assorted gubbins (handles, piping, corners, etc) have now arrived, so seems a good time to show how it's shaping up before I carry on...
New baffle! T-nuts in, stand-off frame glued on and waiting for cloth. Pretty tight for 2x12 speakers, but they do fit. Baffle is 15mm birch ply, nice quality stuff and thick enough, I reckon.
Cab stripped and sanded, with screw holes and dents all filled. The blue-ish grey stuff is some light residue left from the former tolex/glue, but it's essentially smooth and flat enough to recover as it is now.
Here's the amp opening/slot. The ply "plug" is glued in pace with a larger piece of ply behind it, screwed and glued to the inner surface of the cab. It's solid. Again, used bog-standard filler around the edges/cracks. It might look a bit messy, but it looks dead flat to me. I'm fairly confident it won't peak through the tolex when it's recovered, but time will tell!
More to come as and when I make some progress.
Cheers for reading.
New fangled trading feedback link right here!
0 LOL 0
LOL 0 Wow! 0
 Wisdom
LOL 0 Wow! 0 Wisdom Base theme by DesignModo & ported to Powered by Vanilla by Chris Ireland, modified by the "theFB" team.
Comments
Edit.....out of interest how did you get the speaker holes so neat, how did you cut them?
This is something I will have to do soon.....
Mine's a bit Heath Robinson, but if you look on youtube you'll find a lot more elegantly made solutions that basically do the same thing.
No sign of the ply rectangle plug peaking through, and generally pretty happy with how it went. Trying to keep the tolex parallel with the piping channel all the way around all four sides is a bit of a challenge. Any slight deviation from the cab being a perfectly flush cube makes the edge wander, but with a bit of repositioning (thank you, TimeBond) and a good bit of stretching, it looks alright. The piping should tug in any slight bagginess near the rounded corners.
More to come.
The important bit of the front corners looks pretty good - namely, the diagonal cut on the front surface where the sides meet the top/bottom pieces. The corner protectors will be covering the bits right on the outside corner, so these don't have to be 100% perfect. Also popped the baffle in to sanity check that it was still fitting as it should.
Cut the back panels and tolexed them both up, too. Still waiting on a few screws to show up, but the panels and jack tray are snug enough to slot in for a quick photo or two.
Brief aside...You wouldn't believe how tricky it is to source black steel cup washers of the right size. Found some slightly larger ones than I would normally use (No 12), and hoping they'll work OK with the No 10 black screws I'm still waiting on.
As you were.
The gold "string" piping. Where to start? What a pain in the balls that was. I've done other cabs with the piping in the other direction, i.e. front-to-back on the top and bottom. I can totally see the point in that - no need to cover the cab in a single uncut piece of tolex around all four sides, can get away with using decent sized offcuts, etc. But this? Pfft. My main take home points, which may save someone out there a lot of pointless fiddling, are...
- Cut and fold the tolex into the channel one side of the channel, before covering the other side. Obvious, really, and I blame TimeBond fumes for my gung-ho "lets get it all covered" plan. The tolex will stretch/move a little bit, so it's better to err on the side of caution and allow a little extra to go into the channel. If you do one side first, it means you won't have two overhanging edges getting in each others way, making it a pain to trim the tolex back the required amount so it only covers the inside wall of the channel, and not the floor of it.
- A thick plastic or steel ruler is ideal for forcing the glued tolex over the channel edge and to butt it up to the inner wall of the channel. This is another reason for doing one side at a time...very easy to get glue/gum on the tolex surface or the ruler if you're battling with two overlapping edges, where at least one of which will be gluey.
- Have something hard and with a rounded end (fnarr) to hand to work the string/piping in once the tolex is glued up. I used the rounded end of the handle of a butter knife. Hold a ruler along the channel edge to guide the string, and push like a bastard from one end to the other. My hands felt like mincemeat at the end, but that's my own fault for not being exact enough with the tolex in the channel (in some sections it folded into the bottom of the channel a bit)
Here's a close-up...It's not too bad, but the depth does waver a bit in one or two spots, where I couldn't work the string in any further. It really doesn't look too bad, unless you get right up close, so on the whole, I'm fairly satisfied with it.
Not pictured, but I've also sorted the screws and cup washers for the back panels, and they look very smart.
Next? Piping and baffle cloth.
A few quick progress pics...
Back panels screwed in place with cup washers. Have to say these look really good, and it was worth the effort scouring eBay for them. BTW I used relatively small panels to leave as large a rear opening as possible...trying to eliminate any chance of boxiness in what is quite a small cab for 2x12. The open area at the back is approximately equal to the combined surface area of the speakers, so there should be virtually no "tuning" to any particular frequency. It sounded absolutely fine in its stock form (pair of cast frame Fanes), so not really too worried about this.
White piping stapled in place. Just a few strands to trim internally, and do the fine cut to butt the ends up to each other in the centre along the bottom edge. It looks like it wavers a bit in the corners, but I think it'll all push out and look flush once the baffle/frame is screwed up tight to it.
Found some old hifi speaker cable languishing in a drawer, that I've used for the speaker hookup wire. It's some swanky silver QED stuff (very thick gauge) that I'd totally forgot I had. Probably audiophile overkill for this kind of job, but it wasn't being used so what the hell. Crimped and soldered some spades on the end and sealed with red/black heatshrink. I've wired using switched Cliff jacks...the L is mono with both speakers in parallel (8 ohm), and R breaks the parallel connection so each speaker (16 ohm) can be used separately. If I want to use the L speaker on it's own, just need to put a dummy jack in the R socket.
Stapling the grille cloth in the next day or so, so should be finished over the weekend.
Baffle covered. Fairly straightforward, and the big diamond pattern makes it pretty clear with regards lining things up.
Good fit, thankfully, with enough extra wiggle room built in for cloth/staples along the baffle/frame edges.
Speakers in and hooked up. Gave it a quick check before adding a dab of solder to each spade to stop any wobbles or wiggles. Why are they always too tight or too loose?
Finally, the money shot...
Looking good, and really really happy with it. Will give it a good work out over the weekend, but initial impressions are good...alnico chime with good mid/low-mid thickness and a dash of top-end presence.
Cheers for reading, and thanks again to @knuckleberryfinn for the donor cab that made it all possible.
The stripe around it adds a really nice touch of class.
If you can solder, why use the push connectors at all? They're a bit crap, as you've found. There is also still a potential failure point between the crimp and the wire, although admittedly it tends to only occur after a couple of decades of corrosion - but if it was me, I would get rid of them and solder the wires directly to the speakers the old-school way - better and more reliable.
Yes, I know most amp manufacturers use push-connectors, and it doesn't change my opinion in any way...
(I would also shorten the cable to the upper speaker so there's no risk of anything snagging it, and rotate the WGS so the terminals are at the top to keep its wires out of the way, but that's probably just my OCD
"Take these three items, some WD-40, a vise grip, and a roll of duct tape. Any man worth his salt can fix almost any problem with this stuff alone." - Walt Kowalski
"Only two things are infinite - the universe, and human stupidity. And I'm not sure about the universe." - Albert Einstein
Cheers
Yeah, to be honest, I soldered the connectors on, and only then discovered they fit the Fane tabs OK, but were sloppy as hell on the WGS. With the iron already out, and itching to test the cab out, I just soldered a bit on each of them for the hell of it. I will probably tidy the cables up a bit down the line, but finish-line fever got the better of me!