

Howdy, Stranger!
It looks like you're new here. If you want to get involved, click one of these buttons!
Categories
- 247.9K All Categories
- 22 >> Start Here <<
- 12 New Members
- 8 FAQs
- 88.8K Gear
- 40.4K Guitar
- 3.5K Acoustics
- 1.3K Bass
- 15.1K Amps
- 17.6K FX
- 354 Digital & Modelling
- 784 Other Instruments
- 8.5K Making & Modding
- 429 Gear Reviews
- 107 Guitar Reviews
- 74 Amp Reviews
- 119 FX Reviews
- 88 Other Reviews
- 756 Made in the UK
- 987 Theory
- 1.9K Technique
- 2.2K Live
- 3.2K Studio & Recording
- 2.2K Making Music
- 232 Events
- 15 Guitar Show 2018
- 866 Plug My Stuff
- 108K Classifieds
- 42.3K Guitars £
- 2.9K Acoustics £
- 145 LH Guitars £
- 925 Basses £
- 10.9K Parts £
- 18.8K Amps £
- 34.9K FX £
- 2.9K Studio & Rec £
- 6.3K Misc £
- 469 Personnel
- 56.1K Chat
- 37.4K Off Topic
- 1.2K Tributes
- 6.7K Music
In this Discussion
Become a Subscriber!
Subscribe to our Patreon, and get image uploads with no ads on the site!
The Bailey BYOG Course - Aug 2012
 TTony
Frets: 28425
TTony
Frets: 28425
I've managed to retrieve some of the posts from this build from Google's cache of that dead forum. I couldn't find all the posts from every day, so what you're getting here is some "remastering" of the original ... sympathetically restored ... with period-accurate restorations (etc) of missing pieces.
So I'll re-share here, together with some pics that I would have posted at the time.
Having trouble posting images here? This might help.
0 LOL 1
LOL 1 Wow! 0
 Wisdom
LOL 1 Wow! 0 Wisdom Base theme by DesignModo & ported to Powered by Vanilla by Chris Ireland, modified by the "theFB" team.
Comments
If I'm honest, whenever I see a build thread, I always want to know how it turned out.
So, this is a cheat pic (should I use a "Spoiler" tag?) showing the final guitar. If you want to see how it came into being, from a few pieces of wood and some electronic bits & pieces, read the rest of the discussion ...
Originally posted, 24 Aug 2012
This time tomorrow, I should (A1 and A6 willing) be well on my way to the Scottish home of guitar buildery.
Somewhere between a 7.5 & 8 hour drive allegedly, so its probably a good thing that the power tools don't come out straight away.
The design is all sorted. Though the design does have a tendency to change as soon as I see something "wow" in the woodstore ... but this time I'm going to try to stick to a "simple is best" design approach.
After a lot of "these ones, no - those ones, no - the first ones" deliberating, Mr Bulldogs is special deliverying some pickups this morning. And the guitar should very much suit them.
I'll try to do a photo-based update post to this thread at the end of every day in the workshop ... so sign up now while there are still some subscription space left.
We get a day off in the middle of the course, to catch breath, relax, sleep and get ready for the second part ... so all suggestions for "what to do in 24 hours in Ayr" will be gratefully received ...
Originally posted, 25 Aug 2012
This is where incredible things happen and dreams come true ...... doesn't look much like a magic castle though, does it ???
That's either a very small fretboard, or it's a very long neck ...
... is it a giraffe ???
Hmmmm ... here's a pic of the sketched layout of the control cavity ...
any guesses ???
Originally posted, 27 Aug 2012 - DAY2
Today ....
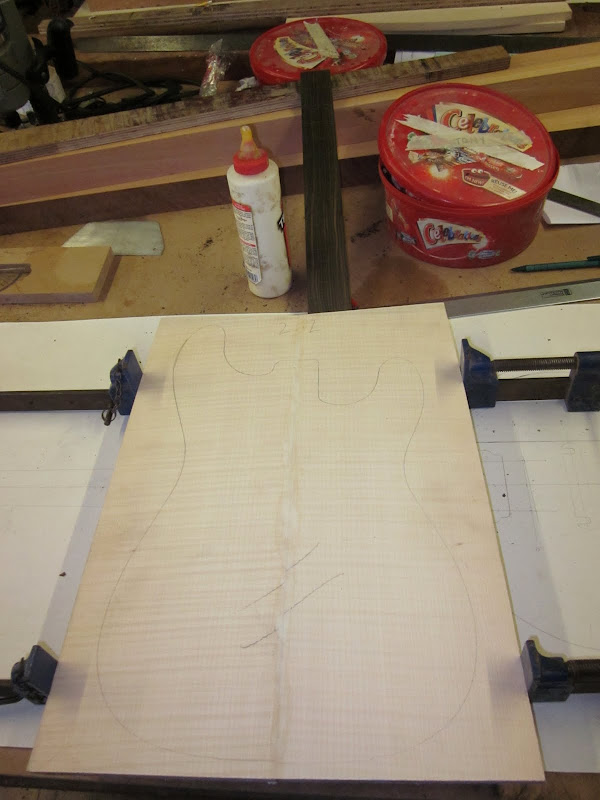
So, it's going to have a cap then. Flamed maple. Looks like it's going to be a bit nice too. I have a colour scheme in mind ...
A lot - LOT - of work to be done on this yet ... but it's shaping up nicely. Some lovely grain on the stripy macassar ebony.
We had a bit of an "event" with this today, which gives us an opportunity for clever solution!! Not sure I should share all here - I'll wait and see whether anyone notices when the guitar is built. You can't see what the "event" is/was from this photo, so no need to guess.
That was pretty much the situation. end of today. The body wings - mahogany - are now glued onto the thru neck, which is a 3-piece mahogany laminate with maple pinstripes. The thru neck will only be visible from the back - the front will have the flamed maple cap right across it (pic 1).
Might get some fretboard inlays done tomorrow ... and some fretting ... and get the cap glued on ... and do some body shaping ....
My feet ache. And I'm exhaling mahogany dust.
Originally posted, 28 Aug 2012 - DAY3
When we left the story yesterday ... the wings had just been glued and clamped to the neck.
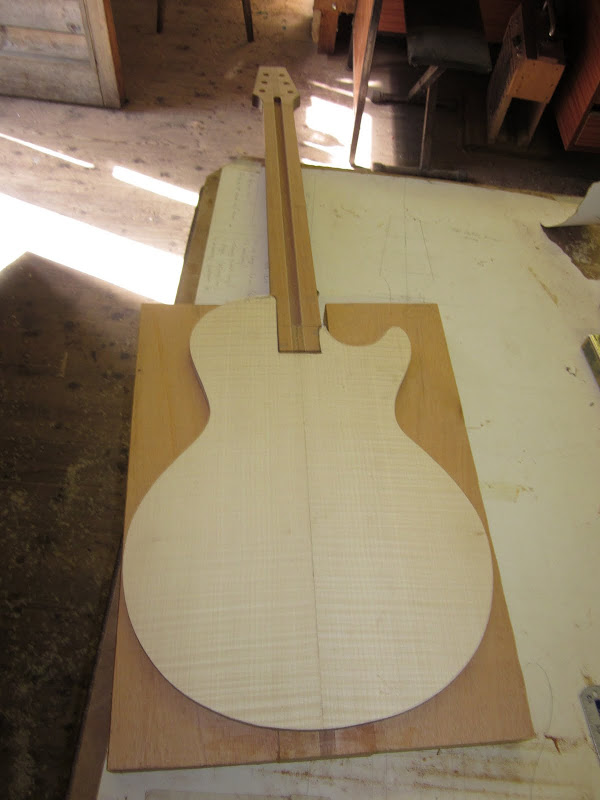


First task today - take off the clamps and get the cap ready
This is the one with the clamps ...
(every guitar building thread needs at least one clamps-shot).
As this is a Gibson-type guitar, I thought I'd add some extra Gibson jointing authenticity ...
Of course, being a thru-neck, this little gap has little-to-no significance - it's merely a small gap that will be completely hidden when the fretboard is fitted on top. But, you like the nod to authenticity?
And the end-shot for the day ...
That's the fretboard glued in place. And all gaps have become disappeared.
It's a day off for us tomorrow. I think I'll do some sunbathing on Ayr beach.
Spreading the course over 7 days makes it a lot less pressured and intense than the old 5-day version. This has been our latest night so far - finished around 8pm, which made it a 10 hour day, but that's hardly hard.
Main jobs to do on Thurs/Fri/Sat ...
fine rout the body shape
rout out all the cavities
carve the body top & back
carve the thru neck into the body (that should be fun, fun, fun)
fretting
all the electrics (a Roland GK kit plus a couple of Bulldogs - Hayden, if you're reading this, I've not paid you yet!!)
the set-up
the spraying ...
not necessarily in that order, and without listing all the other "minor" jobs that also need to get done.
So, I'm planning on getting plenty of rest tomorrow.
Would have been posted 29 Aug 2012 - DAY4
In an effort at protecting the sanity of all involved, the BYOCG (Build Your Own Custom Guitar) now has a mandatory day off in the middle of the course.
It allows everyone to take a breath, and enjoy all that Ayr has to offer.
Actually, I drove into Glasgow to meet up with StevieB (as he used to be known) where I ended up buying his Goldtop JJ.
And a very nice guitar that is too.
I also took a drive up & down the West coast and the sun shone. Only briefly, but it's still gone down in Scottish folklore as the "day the sun shone".
See ...
Don't worry - more guitar-buildery pics tomorrow ...
Would have been posted 30 Aug 2012 - DAY5
Can't find anything in the Google cache for the post that I would have made on this day, so here's a skilfully restored post, using the original photos that I posted (I know that, because they're all in a separate album)
Looks like some neck shaping going on here ...
Mark's approach to neck carving is to do it by hand. I know that you can use routers and other power tools (and I've done it that way once) but I love the way that the neck carve takes shape with the application of rasps and sandpaper. It's harder work, but it's more rewarding.
This being a thru neck (you've noticed that by now??), I also need to carve the neck heel / body joint. I've been looking forward to this bit since I decided on the design spec for this guitar. This part was most definitely inspired by Feline's work on his neck joins. Which look stunning.
But, back to this one ...
Looks like some fretting has been done, and some marking out for the p'ups and controls ... it's really starting to look like a guitar now. Yes (for anyone who's noticed the hammer), the frets are put in by hand, with the help of an 'ammer. But it is a fretting hammer and no frets are harmed during the process ...
Would have been posted 30 Aug 2012 - DAY5
Just before everyone headed off to the pub for an Open Mic evening, hosted by Mark & Carol, at which much mead was imbibed and much merriment was had, just time to walk along Ayr beach to watch the sun go down.
Yes, the sun. Twice!!
Would have been posted 31 Aug 2012 - DAY6
Nothing too complex or extravagant with the top carve for this ... which is just as well as it all had to be done in a few hours. By hand and rasp once more ...
The back's looking good. I think my back was probably in agony by now, but it's worth it ...
And the neck/body join is taking shape nicely
This one looks like the final photo of the day ... top carved and sanded, and I'm guessing that the back has had some more attention from the sandpaper too (because I've just sneaked a look at tomorrow's first photo, so I know what happens overnight!!)
Originally posted 1 Sept 2012 - DAY7
This shot might explain the pots and switches ...
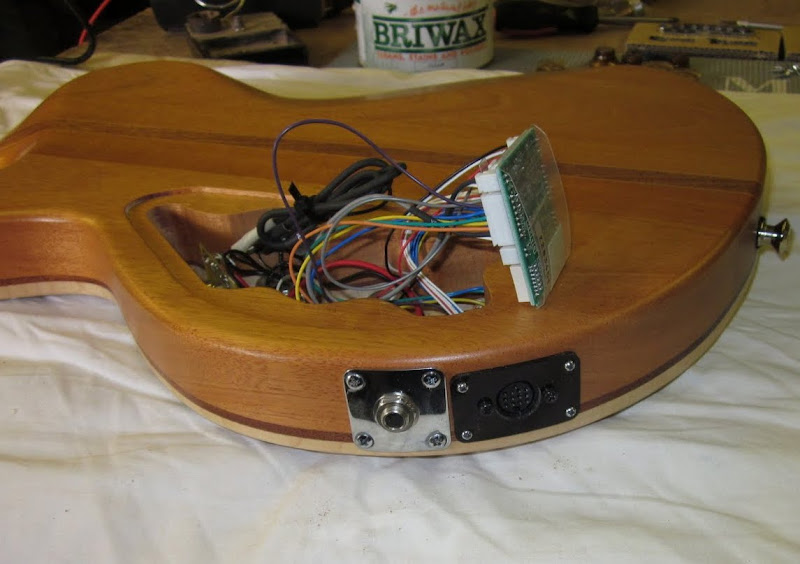
The wiring was actually surprisingly simple. It's a Roland GK kit which essentially consists of the pickup, the circuit board, the socket and a couple of switches. And a load of wiring, but the wiring is simple - solder one end to the appropriate socket or switch, and just plug the other end onto the circuit board.
The kit comes with a couple of black plastic circular rocker switches for the up/down control of the synth. I used a momentary mini-toggle instead ... which you get to see in a later pic!
A little teaser for the main full-body shot which is coming up ...
Not the best photo ever, but it's good enough to give you all an idea of how it all looks.
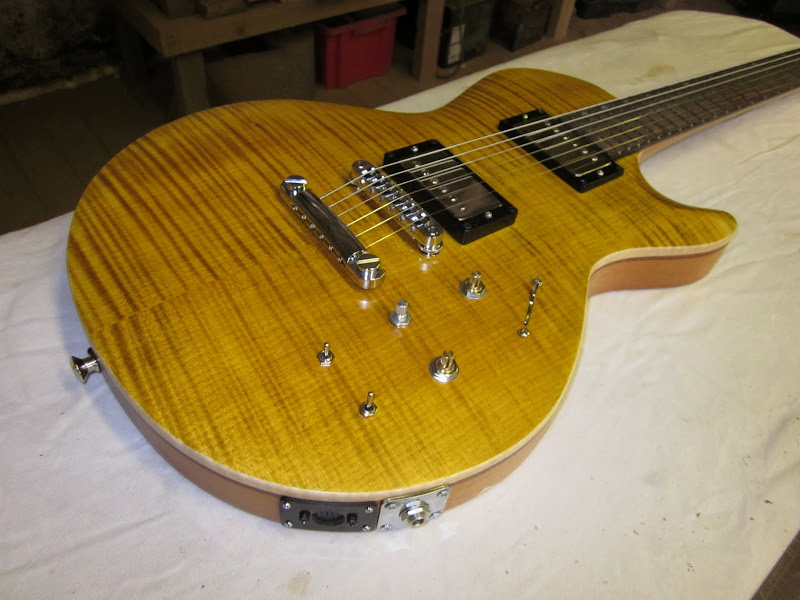
I'll get some better ones taken in the next day or two.
I'm thinking I'll swap out the black plastic p'up rings for something a little more suitable. And I'm still thinking about the knobs to use for it.
But I'm happy.
That's 6 days of hard work there. It was a joint effort too. It wouldn't look like it does without Billy's spraying skills. It wouldn't play like it does without Mark's teaching skills and guitar building expertise.
I've said this a few times before - the Bailey guitar building course is one of the best experiences I've ever enjoyed.
It's not just about learning how to build guitars, learning all sorts of theory and tips & tricks (though you do). It's not even just about building a brilliant guitar (though you do). It's not just about spending a week, in a workshop, with 4 other like-minded souls, sweating, swearing and getting covered in sawdust. It's not just about forgetting about everything else in the world for the week - because you're fully focused on what's going on the workshop. It's not just about all the conversations, all the sharing of experiences, all the jokes and chat. It's just not about the great food (Fiona - open the soup shop!).
It's about all of that - and more. You might think that £2k (roughly what the custom course costs) is a lot to spend on a guitar. It is. But (a) you don't have to spend that much - Mark's running a whole range of different courses now - and (b) you get so much more than a guitar from the week.
You could spend £2k on a flight to somewhere hot and food and drink (and drink - unless you've binned that nonsense) for a week's holiday. You'd come back with sunburned bits, a headache and maybe a trip to the docs for some tablets.
Or you could spend £2k on a Bailey course.
No contest.
Mark is incredibly calm, despite all the numpties who can't use a chisel, or can't draw straight lines, or measure in inches, or see that blindingly obviously fraction-of-a-mm scratch, or any of the numerous other mistakes that I made at different times through the last week.
Thanks Mark, thanks Carol, thanks Billy, thanks Fiona.
Oh, and thanks to my wife who was happy for me to disappear off for a week to do the course again!
Thanks also to Peter, Peter and Steve who I spent the last week with. Despite speaking with funny accents and trying to scare me with tales of wingless blood sucking midges that live in Lochs ... it was a great week.
And thanks to all you peeps too who've been reading this thread, and to those of you who have posted thoughts and comments.
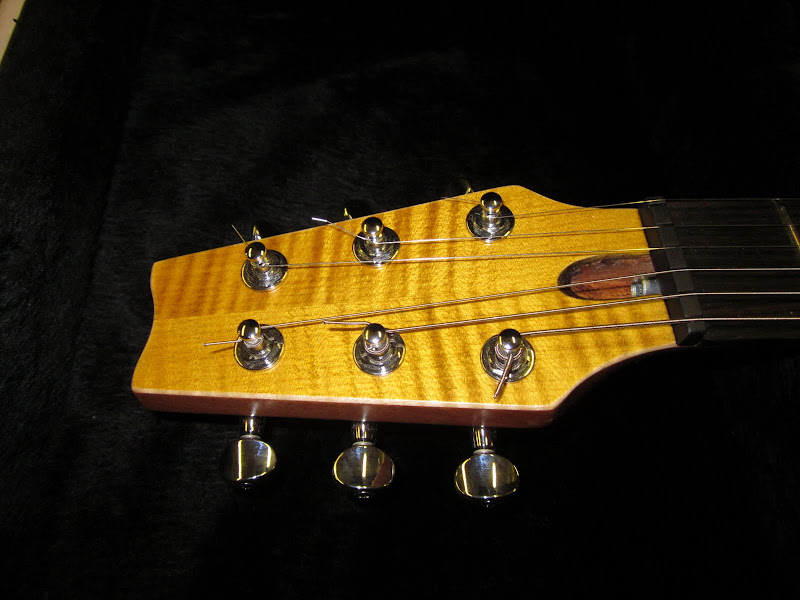
Now, the eagle-eyed amongst you will have noticed that there's something missing on that "final" photo.
The guitar has all the wiring, and the output socket, for the Roland GK3 kit, but I see no Roland GK3 pickup anywhere ...
Hmmmm.
There is another day to the course - the Sunday morning - which is reserved for final set-up, tweaking, and generally making sure that the guitar is completely finished, perfectly playable, and thus meets the criteria for release from Mark's workshop.
Except ... I needed to get home (7 hours drive away) by lunchtime, so I left with special dispensation to get the guitar finished when I got home.
That doesn't normally happen, and it was something of an honour that Mark trusted me (a) to do it myself, and (b) to do it right!!
The pickup has quite a chunky cable coming out of it, and the bridge pickup cavity was quite a nice tight fit for the bridge pickup, without any additional cables trying to force their way in.
So some careful mods were required ...
That might look a bit messy, but - believe me - it was done very carefully!
Let's just check that it all fits now ...
And swap the black plastic pick-up rings for something a little more in-keeping with the quality of this guitar ...
At the time, I did think that I'd done it. Completed it. Finished it. All ready to play ... and I had - almost.
A couple of "I love this bit" shots ...
Firstly, the fretboard markers. I'd tested this before I went on the course, but only twice. For it to work on the actual guitar, I had to make it work rather more than twice. All marked and drilled freehand of course, and they all turned out within tolerance (ie you can't see any of them being hugely off-centre from more than a couple of feet away) ...
And this is another of my favourite parts of this guitar. Inspired by Feline's neck join and carve, this feels so comfortable to play ...
Anyone looking carefully might have noticed that a couple of the switches and knobs have moved position between the guitar leaving Mark's workshop, and it subsequently leaving mine ... just for ease of use when playing.
Here it is as-of today ...
And with it's Bailey-BYOG-Brothers ...
At the bottom of the shot, my first Bailey Build from 2007. In the middle, the guitar that I made about 6 months later - and for which I've already recreated the build blog here. At the top ... well, you know all about that one now.
Thanks Mark Bailey.
I did mine instead of a "normal" family holiday.
Mainly because we're not a normal family .
.
(That course might be just the thing for a "big birthday". Hmm...)
I'd like to build something like your first effort, cos that's my ideal looking electric. It's gorgeous.
Thank you.
It's not cheap, but then I did the last course instead of a holiday (it was my holiday), I don't go out a huge amount (no mates), and the offspring have more-or-less sprung ... so it was financially feasible.
You build a guitar that's easily "worth" the cost of the course, you learn some hugely valuable practical skills, you spend a week with some likeminded people generally having fun, and you get a few nights out in Ayr*. So, even though it's expensive, I'd say it's well worth it. Mark's running some cheaper option courses now as well, although it helps if you live closer to him than I do!
*Luckily, the few nights out in Ayr are sort of thrown in for free ...
To be fair to Mark, it's not just the cost of the course that's prohibitive for me. I'd need to find someone or somewhere to care for my missus while I'm away, which could easily cost more than the course would, so in the worst case, I'd be looking at 4-5 grand in all.
:-<
And while I'd love to make something of my own worth having, I could get a USA Strat and a Lowden for that sort of money.
Maybe when I win the lottery, eh?