

Howdy, Stranger!
It looks like you're new here. If you want to get involved, click one of these buttons!
Categories
- 247.9K All Categories
- 22 >> Start Here <<
- 12 New Members
- 8 FAQs
- 88.8K Gear
- 40.4K Guitar
- 3.5K Acoustics
- 1.3K Bass
- 15.1K Amps
- 17.6K FX
- 354 Digital & Modelling
- 784 Other Instruments
- 8.5K Making & Modding
- 429 Gear Reviews
- 107 Guitar Reviews
- 74 Amp Reviews
- 119 FX Reviews
- 88 Other Reviews
- 756 Made in the UK
- 987 Theory
- 1.9K Technique
- 2.2K Live
- 3.2K Studio & Recording
- 2.2K Making Music
- 232 Events
- 15 Guitar Show 2018
- 866 Plug My Stuff
- 108K Classifieds
- 42.3K Guitars £
- 2.9K Acoustics £
- 145 LH Guitars £
- 925 Basses £
- 10.9K Parts £
- 18.8K Amps £
- 34.9K FX £
- 2.9K Studio & Rec £
- 6.3K Misc £
- 469 Personnel
- 56.1K Chat
- 37.4K Off Topic
- 1.2K Tributes
- 6.7K Music
Become a Subscriber!
Subscribe to our Patreon, and get image uploads with no ads on the site!
Rotary Tool Home-brew Add-ons
 Nomad
Frets: 549
Nomad
Frets: 549
I made another thing for my mini rotary tool Dremel-type thing today, so I thought it would be worth starting a thread to describe these.
The next post is moved from my lap steel build thread, since it's not really part of the build itself.
Here's the rotary tool on the router stand...
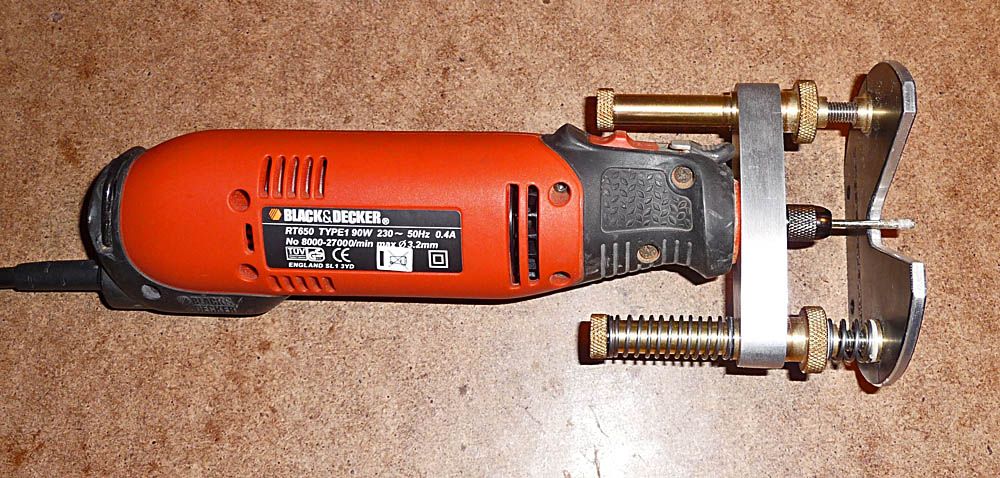
This one is a mains powered Black & Decker RT650, which I've had for a while now. I find it quite powerful - never seems to drop the revs much. Two things I'm less keen on with it are the mains cable itself, which isn't very flexible, and I'd rather have a hex shape on the collet clamp so that I can get it tighter. Pliers work, but a spanner is better. Aside from those, it has served me well, and I might eek out some silicone-sheathed cable for it when I can be bothered.
The stand is from Luthier Tools: http://www.luthiertools.co.uk/routerbaseinfo.html and is very nicely made. I'd say it's an essential add-on for a rotary tool. I've never been keen on using it freehand because it can dig in and jump about a bit (I shaped the outside of the bowl of a tobacco pipe with mine ages ago, and it needed some care). The stand gives you a means to hold the tool perpendicular to a surface, and, by holding or clamping the stand itself, a means to have the tool held in a fixed position while you manipulate the work against the cutter. There are a few other sources for similar stands. While it might seem a bit pricey, it is well worth it.
Nomad
Nobody loves me but my mother... and she could be jivin' too...
 LOL 0
LOL 0 Wow! 0
 Wisdom
 Base theme by DesignModo & ported to Powered by Vanilla by Chris Ireland, modified by the "theFB" team.
Comments
First up is a doohickey...
http://i1279.photobucket.com/albums/y521/Nomad_Zamani/Tools/Micro%20Router%20Dust%20Extractor/Micro%20Router%20Extractor%2001_zpshct8kwrm.jpg
This particular doohickey is a crap sooker for use with a micro router (which is a Dremel type tool on a height adjustable stand). The big aluminium bit is sized to fit in the end of the vacuum cleaner hose. The thing in the middle of that is an air fitting and the 6mm air line is a push fit into that. At the other end is a bit of copper brake pipe and a little clamp affair with an M4 torque knob.
It fits onto the back of the micro router stand...
http://i1279.photobucket.com/albums/y521/Nomad_Zamani/Tools/Micro%20Router%20Dust%20Extractor/Micro%20Router%20Extractor%2002_zpsxkgkiwc7.jpg
Those that are familiar with these stands probably know that it has a bit of brass tube fixed into the back, to which a blow air line is fitted, and the air is routed to the underside of the ally cross-member and blows the crap away. I couldn't see the point of just spreading the stuff around, and the brass fitting happened to have a 3.4mm diameter hole in the middle, which is very close to the 3.3mm hole that's drilled before tapping a hole for M4. So I duly tapped it M4. The other hole in the little clamp is also tapped M4. This is to provide a place to fit the screw when the crap sooker is detached from the micro router - that way, it doesn't get lost.
Here's another view...
http://i1279.photobucket.com/albums/y521/Nomad_Zamani/Tools/Micro%20Router%20Dust%20Extractor/Micro%20Router%20Extractor%2003_zpsiz4ycbwa.jpg
You can see the sticky-outy brass fitting more clearly here. The good thing about the copper brake pipe is that it's quite soft and is easily bent into the shape you need. (I also used a loop of the stuff for the wire guide on my home-brew pickup winder.)
Time to give it a try. The first photo here is with the vacuum off. The cutter is a 2mm carbide slot drill and was spinning at a moderate speed. The wood is an offcut of the meranti that I'm using to make the lap steel (the rosewood hasn't arrived yet).
http://i1279.photobucket.com/albums/y521/Nomad_Zamani/Tools/Micro%20Router%20Dust%20Extractor/Micro%20Router%20Extractor%2004_zpsdx774grs.jpg
I made a cut about 8mm or so square and about 1mm or so deep. As you can see, you can't see it due to the veritable festoonery of crap.
Here's another cut with the vacuum on....
http://i1279.photobucket.com/albums/y521/Nomad_Zamani/Tools/Micro%20Router%20Dust%20Extractor/Micro%20Router%20Extractor%2005_zpsgkgyx7zd.jpg
There was no clean-up at all, here - in each case, I did the cut, stopped the machine in-situ and took the photo.
Nomad
Nobody loves me but my mother... and she could be jivin' too...
I've been thinking about how to use the rotary tool / micro router for working edges of thin materials, and came up with this...
Take a bit of plank...
http://i1279.photobucket.com/albums/y521/Nomad_Zamani/Tools/Micro%20Router%20Shaper%20Table/Micro%20Shaper%2001_zpsm8xpm3ky.jpg
This is an offcut of the meranti I'm using for the lap steel. It's 20mm thick, 135mm wide, and some length or other that I didn't measure.
Add a centre line, a centre point that isn't in the centre of the plank, and mark out a 100mm square. Cut some 100mm square bits of thin plywood (3.3mm or so thick, as it happens)...
http://i1279.photobucket.com/albums/y521/Nomad_Zamani/Tools/Micro%20Router%20Shaper%20Table/Micro%20Shaper%2002_zpsmowsy5h2.jpg
Clamp the plank to the milling machine with some sacrificial material (hardboard) underneath...
http://i1279.photobucket.com/albums/y521/Nomad_Zamani/Tools/Micro%20Router%20Shaper%20Table/Micro%20Shaper%2003_zpsg9ugzn9h.jpg
Bung a hole - of a specific diameter - part-way through at the marked centre point...
http://i1279.photobucket.com/albums/y521/Nomad_Zamani/Tools/Micro%20Router%20Shaper%20Table/Micro%20Shaper%2004_zpsiq2w4y9v.jpg
...and mill out the 100mm square to a depth a little shy of the thickness of the plywood.
Then, fit the rotary tool onto its router stand, fit a tool with a diameter that matches the centre hole in the plank, and stick it in the pocket in the plank...
http://i1279.photobucket.com/albums/y521/Nomad_Zamani/Tools/Micro%20Router%20Shaper%20Table/Micro%20Shaper%2005_zps6dnowvu2.jpg
Mark around the base of the router stand...
http://i1279.photobucket.com/albums/y521/Nomad_Zamani/Tools/Micro%20Router%20Shaper%20Table/Micro%20Shaper%2006_zpspall24py.jpg
...and mill out another pocket (square is fine and much easier) to match the thickness of the baseplate on the stand. Stick the micro router in to check for fit and centre...
http://i1279.photobucket.com/albums/y521/Nomad_Zamani/Tools/Micro%20Router%20Shaper%20Table/Micro%20Shaper%2007_zpsm7gqsasx.jpg
Take some non-fussy measurements of the width of the upper parts of the stand and the rotary tool, mark out some lines and mill through the rest of the plank into the sacrificial material...
http://i1279.photobucket.com/albums/y521/Nomad_Zamani/Tools/Micro%20Router%20Shaper%20Table/Micro%20Shaper%2008_zps8stkcoek.jpg
Clean up the burrs, clamp it to the bench and stick the micro router in upside down...
http://i1279.photobucket.com/albums/y521/Nomad_Zamani/Tools/Micro%20Router%20Shaper%20Table/Micro%20Shaper%2009_zpsf4drgfsk.jpg
Tidy the edges of the plywood squares so that they fit the upper pocket, use the tool - in-situ - to drill pilot holes in the centres, and then choose a cutter and make a hole that matches the cutter...
http://i1279.photobucket.com/albums/y521/Nomad_Zamani/Tools/Micro%20Router%20Shaper%20Table/Micro%20Shaper%2010_zpsssindd4j.jpg
This cutter can do a plunge cut, so it was used on the tool to make its own hole. For other fittings that can't drill by themselves, like diamond burrs or the little sanding drums, the pilot holes in the bits of plywood can be used to get larger holes in the correct position.
I had a little play with a scrap of the plywood...
http://i1279.photobucket.com/albums/y521/Nomad_Zamani/Tools/Micro%20Router%20Shaper%20Table/Micro%20Shaper%2011_zps6e38irni.jpg
The cutter is about 3mm in diameter, and the shaping was done freehand. Seems to work really well so far.
The reason the first pocket is slightly shy of the plywood thickness is to ensure that the plywood surface is not recessed into the plank. That way, there is scope to work with parts that are bigger than the 100mm square without having to flex them down into a small recess. It also means that any parts that could get close to the sides of the pocket won't catch - they'll just extend over the edge of the ply.
Still to do: Round off the two front corners of the plank, soften the edges, and give it all a coating of boiled linseed oil. I also want to add a thing to hold the business end of the dust extractor. Part of the plan behind this is for working the edges of inlay, and I want to be sure that the dust gets drawn away.
Nomad
Nobody loves me but my mother... and she could be jivin' too...
Finished off the shaper table. No in-between photos, but here's the finished article...
http://i1279.photobucket.com/albums/y521/Nomad_Zamani/Tools/Micro%20Router%20Shaper%20Table/Micro%20Shaper%2012_zpsam4nabea.jpg
Rounded off the main corners and softened the edges for a bit of comfort on the hands if they happen to rest there. Another bit of copper brake pipe for the extraction, which is clamped in a block at the back. The block is held on with a static M6 screw and a wing nut is used to clamp down on the pipe (there's a slit along the width of the block). It can be slackened off easily and the position of the pipe adjusted if desired.
Because there was little in the way of measuring, the plywood inserts only really centre in one orientation, so there's a round tool mark at the back (which can be seen on one of the loose inserts), on the underside of each piece. Pop it in with that facing downwards, and the pilot hole lines up with the tiny carbide drill I used to make it. The recess at the back edge is to get a fingernail under the edge to make it easier to remove, although I've found that pushing up at the front, in the V cutout in the router base, works as well.
A lick of linseed oil over everything finishes it off.
The brake pipe dust extractor doesn't have a lot of sook in practice, but it does seem to work quite well. This is after using a burr to sand round this test piece (the shaping was done with the cutter shown in the previous post)...
http://i1279.photobucket.com/albums/y521/Nomad_Zamani/Tools/Micro%20Router%20Shaper%20Table/Micro%20Shaper%2013_zpslagmnwbm.jpg
Again, sanding with the vacuum off resulted in a lot more dust. The acid test will be when I try working the edge of some mother of pearl (I got a small piece to experiment with, as well as a larger piece for the lap steel project).
So far, I'm very pleased with this. About half of it was visualised before I started, and I worked the rest out as I went along.
Nomad
Nobody loves me but my mother... and she could be jivin' too...
Nice, looks like good useful fettling there.
Cheers Bill. I have to say, making useful stuff out of scrap is rather satisfying.
Something I didn't mention was that the block is loose when the wing nut is slackened, meaning the pipe can be rotated out of the way to make room to get the micro router in and out. The pipe is also very ductile, so it can be bent into the desired position - handy if a taller sanding drum is being used. The area that it can pick from is quite small, so it's slightly to the right of the tool's centre because the dust tends to get thrown off on that direction (it turns anti-clockwise when upside down).
Nomad
Nobody loves me but my mother... and she could be jivin' too...
This next bit isn't an add-on for the micro router, but the above are for the purpose of making inlays, so I've decided to add this to the same thread.
Step 1: Get a random bit of offcut plank that looks about the right length...
http://i1279.photobucket.com/albums/y521/Nomad_Zamani/Tools/Jewelers%20Saw%20Table/Jewelers%20Saw%20Table%2001_zps2ibefhfc.jpg
...and bung a bit of line on it at about the right width. Then square off the ends on the bandsaw and rip down the line.
Next, take a random bit of scrap and use the masking tape and superglue trick to hold it onto the bit of plank...
http://i1279.photobucket.com/albums/y521/Nomad_Zamani/Tools/Jewelers%20Saw%20Table/Jewelers%20Saw%20Table%2002_zpsec9amzzf.jpg
Hold the pieces vertical and flat on the (disposable hardboard surface of the) bench, and...
http://i1279.photobucket.com/albums/y521/Nomad_Zamani/Tools/Jewelers%20Saw%20Table/Jewelers%20Saw%20Table%2003_zpsf6lqfu6j.jpg
...you have s stuck-fast holder-outer. (Try this at home, kids - it really works.)
Over to the bandsaw, place the bits carefully against the fence...
http://i1279.photobucket.com/albums/y521/Nomad_Zamani/Tools/Jewelers%20Saw%20Table/Jewelers%20Saw%20Table%2004_zpspjq4bw7o.jpg
And lop off a wedge-shaped bit...
http://i1279.photobucket.com/albums/y521/Nomad_Zamani/Tools/Jewelers%20Saw%20Table/Jewelers%20Saw%20Table%2005_zpskw5wano5.jpg
http://i1279.photobucket.com/albums/y521/Nomad_Zamani/Tools/Jewelers%20Saw%20Table/Jewelers%20Saw%20Table%2006_zpsqgi65c7h.jpg
At this point, I realised that the angled portion was too long - I need more flat than I have here. To us pros in the home hobby workshop, this is technically known as a "fuck up", resulting from being too lazy to bother measuring (not twice, not once, but not measuring at all).
Not a problem, however. Flip it over to present the flat side to the fence, and resaw to get a bigger flat bit...
http://i1279.photobucket.com/albums/y521/Nomad_Zamani/Tools/Jewelers%20Saw%20Table/Jewelers%20Saw%20Table%2007_zpsmaxzbrzz.jpg
That looks fine. After a bit of sanding to get the surfaces reasonably flat, mark a centre point at some random distance from the thin end, and add a couple of pencil marks...
http://i1279.photobucket.com/albums/y521/Nomad_Zamani/Tools/Jewelers%20Saw%20Table/Jewelers%20Saw%20Table%2008_zpsnb697l1e.jpg
Over to the pillar drill (or milling machine in this case), prop up the thin end with some bits of scrap...
http://i1279.photobucket.com/albums/y521/Nomad_Zamani/Tools/Jewelers%20Saw%20Table/Jewelers%20Saw%20Table%2009_zpsa3a8sxlu.jpg
...and bung a hole through it. Note that, even though there is a void underneath due to the wedge shape, the XY table of the milling machine has been positioned such that the drill bit will drop into the centre T-slot rather than damage the table.
Flip the bit over, transfer the pencil marks to the sloping face and extend them to the hole...
http://i1279.photobucket.com/albums/y521/Nomad_Zamani/Tools/Jewelers%20Saw%20Table/Jewelers%20Saw%20Table%2010_zps9ethdj4e.jpg
The two lines were then cut out freehand on the band saw (flat side down for stability), after which there was more sanding - corners rounded off and edges softened (except for the two edges of the notch on the flat side). Here's why I like the cheapie Clarke sander with the 1" floating belt...
http://i1279.photobucket.com/albums/y521/Nomad_Zamani/Tools/Jewelers%20Saw%20Table/Jewelers%20Saw%20Table%2011_zps7xodshsp.jpg
Getting into the notch was a breeze.
With a bit more sanding with the palm sander, followed by some more by hand (using one of the many foam sanding blocks that litter the floor of my workshop), I ended up with...
http://i1279.photobucket.com/albums/y521/Nomad_Zamani/Tools/Jewelers%20Saw%20Table/Jewelers%20Saw%20Table%2012_zpsyzxnidkz.jpg
http://i1279.photobucket.com/albums/y521/Nomad_Zamani/Tools/Jewelers%20Saw%20Table/Jewelers%20Saw%20Table%2013_zpsbzlxnfn4.jpg
...a wedge-shaped bit of wood with a notch in it. What's it for? You clamp it to the bench like this...
http://i1279.photobucket.com/albums/y521/Nomad_Zamani/Tools/Jewelers%20Saw%20Table/Jewelers%20Saw%20Table%2014_zpsj9e92cuy.jpg
...and use a jewellers saw to make the main shaping cuts in inlays. The saw is used with down-strokes, while the piece is supported on the saw table, held and manipulated with the fingers of the other hand. The diameter of the hole at the thin end of the notch might be a bit big, depending on the size of the thing being cut, but there is always the option to make it smaller (a quick nickety-nick on the bandsaw). It will tend to get damaged anyway because the saw blade is bound to catch the sides of the notch now and then, which makes the addition of linseed oil...
http://i1279.photobucket.com/albums/y521/Nomad_Zamani/Tools/Jewelers%20Saw%20Table/Jewelers%20Saw%20Table%2015_zpsqjva6b4d.jpg
...somewhat superfluous. Still, I think it looks nice with the oil on it.
Nomad
Nobody loves me but my mother... and she could be jivin' too...
Instagram
The idea is to use the saw table only for sawing out the main shapes - the tidying up is done on the micro shaper.
Nomad
Nobody loves me but my mother... and she could be jivin' too...
I tried the saw table first, with a jeweller's saw. The blades I have are numbered 4, 2 and 2/0, which appear to be in descending order of size and increasing tooth density (or, cuts become finer). Less difference between the 2 and 2/0 than either of these from the 4. Here's a photo of the test piece with some cuts in it...
http://i1279.photobucket.com/albums/y521/Nomad_Zamani/Tools/Jewelers%20Saw%20Table/Inlay%20Test%2001_zpskgro2naf.jpg
The overall size of the piece is 22.4mm from top to bottom, and the short side near the cuts is 12.3mm. The cuts are, left to right, made with the 2/0, 2 and 4 blades. In all cases, the initial bite felt a bit fiddly, but once the cut was underway, it was all quite smooth and controllable. Getting the blades to turn in the cut was fine - in the 2/0 cut, I went in, turned right, and then did a little turn left at the end. Of the three blades, I was less happy with the 2 - the cutting action didn't feel as smooth as the other two.
The saw table worked fine with this size of piece. I didn't have it right up at the narrow end of the notch - just held it at one side maybe 15-20mm away from the round end. It all felt nice and stable - no rocking or slipping. (The reason the upper edges of the notch weren't softened was to give it the best chance of not rocking during downstrokes, although I think this piece is big enough for that to not happen anyway - plenty of area over the flat surface of the table to get a fingertip onto.)
You can see the difference in the width of cut in this closer shot...
http://i1279.photobucket.com/albums/y521/Nomad_Zamani/Tools/Jewelers%20Saw%20Table/Inlay%20Test%2002_zps2sshgwrs.jpg
The 2/0 and 2 are about the same, and the 4 is wider. While cutting, there was a fair amount of very fine dust. Being what it is, I was up close to the thing and wore a dust mask (might try setting up extraction while sawing).
You can also see some curvature of the vertical edges near the cuts - fairly obvious on the left and slight on the right. These resulted from some work on the micro shaper using diamond burrs.
Here's a view of the left-hand edge...
http://i1279.photobucket.com/albums/y521/Nomad_Zamani/Tools/Micro%20Router%20Shaper%20Table/Inlay%20Test%2004_zps54hisbh3.jpg
And here's the right...
http://i1279.photobucket.com/albums/y521/Nomad_Zamani/Tools/Micro%20Router%20Shaper%20Table/Inlay%20Test%2003_zpsrsknwr84.jpg
Note the saw cut at the right-hand end - it's well off perpendicular to the main flat surfaces. Some technique improvement needed, there.
In both, the left-hand end is untouched - it's the sawn edge as supplied. (The material is 1.9mm thick, incidentally.) The left-hand edge was done using a burr 3mm in diameter, and the other with one 1.2mm dia. The smaller burr seemed to struggle to make much headway (even though the machine revs were quite high - about 22,000 rpm). Part of the problem with this one was that it tended to flex, being so small, which led to me being cautious about applying too much pressure. With the 3mm burr, flex was much less, and it seemed to eat into the material quite happily. Both shapes had about the same amount of time spent on them.
The process of working the material was absolutely fine - control was easy, there was no snagging, and judging how much material was coming off, especially with the bigger burr, was fine. As with the bit of plywood test previously, there was virtually no dust - I'd be happy work with this material on the shaper with no dust mask.
It was interesting to see the horizontal scoring in the worked areas - a natural consequence of the burrs being at a fixed height (and possibly being crappy burrs that could have been made better). Not sure yet if this is a bad thing, but it strikes me that this would provide something for the glue to key to when the inlay is being set, and it will be hidden when done, so I can't think of a reason to be unhappy about it.
Overall, so far, I'm impressed, both with the micro router and the add-ons I've made for it. I think my next step is to come up with a shape and try making a proper inlay from this test piece.
Nomad
Nobody loves me but my mother... and she could be jivin' too...
Measured the cut widths for the hell of it...
Blade 4: 0.46mm
Blade 2: 0.40mm
Blade 2/0: 0.35mm
Nomad
Nobody loves me but my mother... and she could be jivin' too...