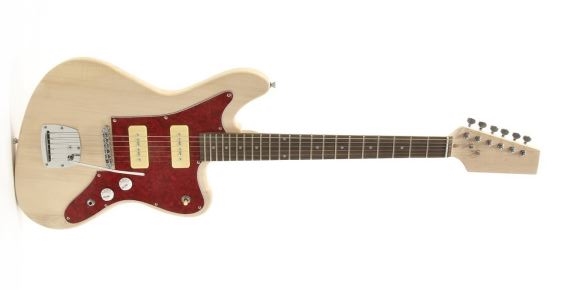
1st guitar build: Jazzmaster type guitar (The Andy Jr)!

What's Hot
47f039b0-da6c-4798-9011-64a0c3c9c618_zpsc227d7ca


0reaction image LOL 0reaction image Wow! 1reaction image Wisdom
«1

Comments

  • Here we go, I discovered the fretboard forums a few weeks before christmas and was instantly hooked. I loved the idea of people building guitars and getting help/advice from others who where maybe more knowledgable than themselves. I also fell in love with what could be done with a 'cheap' kit and a bit of time and patience. My wife bought me The seattle jazz kit from Gear4Music as an xmas pressie and this past 3 weeks i've been building it. It is now completed, minus one snag which I'll come to near the end. I'd just like to say that in my 22 years of playing i've never even soldered a pickup or set intonation or action on even 1 guitar. Damn, I so wish I had discovered the Fretboard forums years ago.


    Photo above!

    0reaction image LOL 0reaction image Wow! 0reaction image Wisdom
  • First thing I did was cut the headstock out. I trawled the internet and found a template for a 72 deluxe strat. It's one of the 'big fender strat headstocks and barely fitted into the blank size
    0reaction image LOL 0reaction image Wow! 0reaction image Wisdom
  • IMG_20150103_174829068
    0reaction image LOL 0reaction image Wow! 0reaction image Wisdom
  • IMG_20150103_175602305
    0reaction image LOL 0reaction image Wow! 0reaction image Wisdom
  • IMG_20150103_195926593
    0reaction image LOL 0reaction image Wow! 0reaction image Wisdom
  • I hadn't used a coping saw since High school woodwork class, but it all came flooding back to me.
    0reaction image LOL 0reaction image Wow! 0reaction image Wisdom
  • IMG_20150111_192516913

    Then the tedious bit. Inking the body (5 or 6 coats in all).

    Done with Diamine Jet Black fountain pen ink.
    0reaction image LOL 0reaction image Wow! 0reaction image Wisdom
  • IMG_20150111_194026983
    0reaction image LOL 0reaction image Wow! 0reaction image Wisdom
  • This took about a week with 1-2 coats per day. I used Ronseal varnish as used and recommended by Andyjr1515. Both ink and varnish applied with microfibre cloths.
    0reaction image LOL 0reaction image Wow! 0reaction image Wisdom
  • IMG_20150103_211936386

    The bit i hate, soldering! The same wire kept coming loose when i eventually tried to fit the pickgaurd to the body, it was a squeeze.
    0reaction image LOL 0reaction image Wow! 0reaction image Wisdom
  • IMG_20150123_164404944

    Machineheads fitted to headstock and there's a big mistake here which I didn't notice until I came to string the guitar!

    I also sanded the back of the neck. To make it faster feeling. Nice and silky smooth.


    0reaction image LOL 0reaction image Wow! 0reaction image Wisdom
  • IMG_20150123_205250889

    Tremolo, bridge and pickguard fitted. Got this done earlier tonight.
    Neck fitted too.


    0reaction image LOL 0reaction image Wow! 0reaction image Wisdom
  • IMG_20150123_205311703

    Looking good (to me anyways. Knobs feel super cheap. This will definitely have to be replaced. So thin it's unbelievable.


    0reaction image LOL 0reaction image Wow! 0reaction image Wisdom
  • When I strung the guitar earlier tonight, I got to the D string and low and behold, there's no hole in the machine head ferrule/spigot to put the string end through. It simply hasn't been drilled. The only real fault I found in the whole build. I'll contact Gear4Music tomorrow to see with they send me another. I've been practicing on my other guitars this past few weeks, my setup skills. Checking intonation, action etc. Things I always got a tech to do. Everything on this guitar as soon as it was put together was perfect, from the off. I couldn't believe it. Not even a slight string buzz and I was impressed with the neck the day the kit arrived I opened it.
    0reaction image LOL 0reaction image Wow! 0reaction image Wisdom
  • Sorry for the crap photos, Google+ and my phone are having tech wars. They weren't 1:1 aspect ratio when I took them. But here's the finished guitar below, a good photo, under energy saver bulbs! Thanks once again to Andy for advice/tutorials on the ink finish. Mine isn't as perfect as his red SG, but I'm happy with it and I now plan to take art in the Harley Benton challenge. Oops ! My wife just checked why I was wasn't in bed yet and I told her there would be yet another guitar coming soon, she ain't a happy bunny. Spare room for me tonight, If and when I get this post done! LOL
    0reaction image LOL 0reaction image Wow! 0reaction image Wisdom
  • My (temp) 5 string guitar!


    DSC_0002
    0reaction image LOL 0reaction image Wow! 0reaction image Wisdom
  • a href="https://www.flickr.com/photos/joe_relic37/15731219643" title="DSC_0004 by Paul Gallagher, on Flickr">DSC_0004
    0reaction image LOL 0reaction image Wow! 0reaction image Wisdom
  • DSC_0004
    0reaction image LOL 0reaction image Wow! 0reaction image Wisdom
  • DSC_0005
    0reaction image LOL 0reaction image Wow! 0reaction image Wisdom
  • Any comments would be greatly appreciated and advice on how I could have done things better etc. Cost of kit incl P+P to N Ireland and 5 yr warranty £107 Microfibre cloths: £4 Coping saw and blades: £6 Diamine ink : £7 Ronseal varnish ££10 Soldering iron, and solder and stand (total) £20 Super Slinky 9's £6 Grand total: £160 Satisfaction at building my first guitar and it actually turning out to be nice to play and sound good too: Priceless! Thank you to everyone on The Fretboard firums who advised me on soldering irons etc. It's now quarter to one in the morning. I'm going to bed. Cheers! Paul
    0reaction image LOL 1reaction image Wow! 0reaction image Wisdom
Sign In or Register to comment.