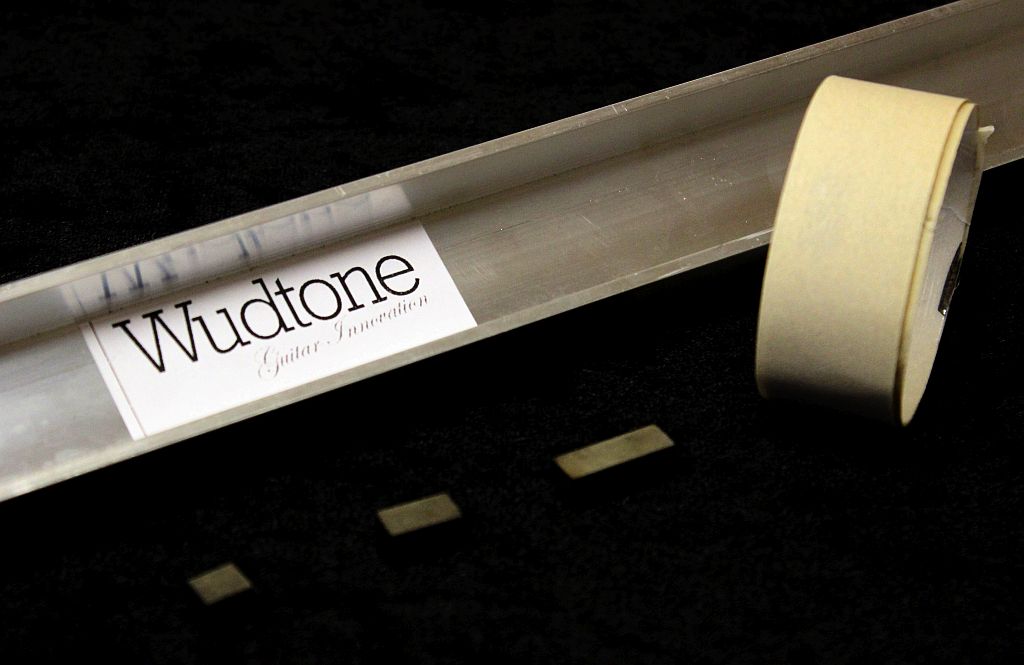
New Wudtone UTFL - Under Tension Fret Leveller - delivers accuracy for best playability every time.

What's Hot
andypwudtoneandypwudtone Frets: 287
edited November 2015 in Made in the UK


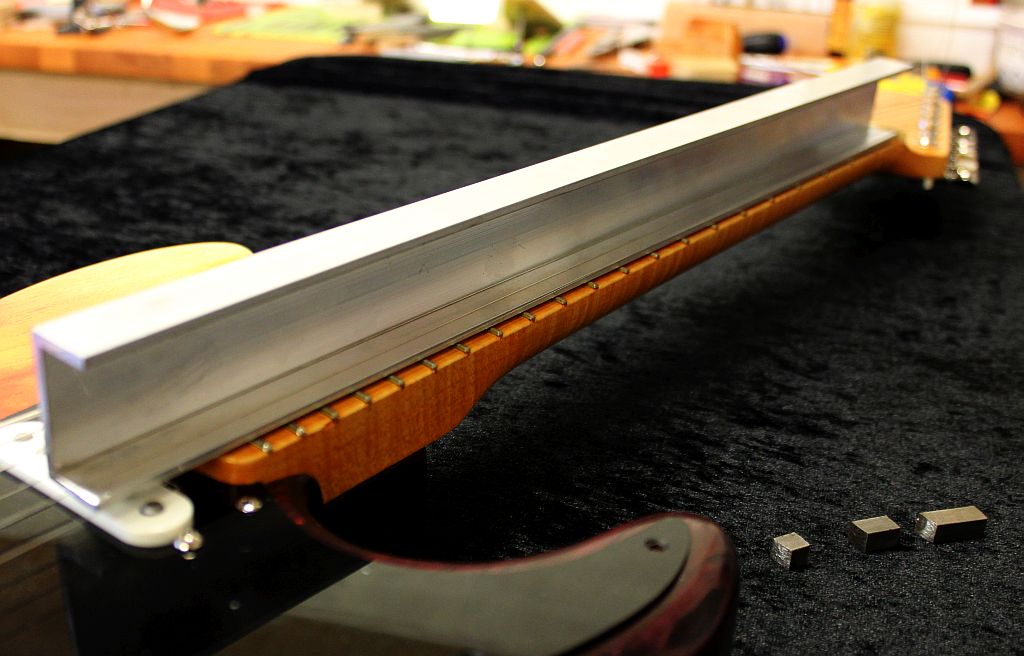
It is critical to level frets under string tension for accuracy, best playability. 

more info at http://www.wudtone.com/product/wudtone-utfl-under-tension-fret-leveller/

image


image

image

image

0reaction image LOL 1reaction image Wow! 0reaction image Wisdom

Comments

  • Levelling frets under string tension is the only way to be 100% confident your are going to get the job done effectively and as accurately as possible for best playability.

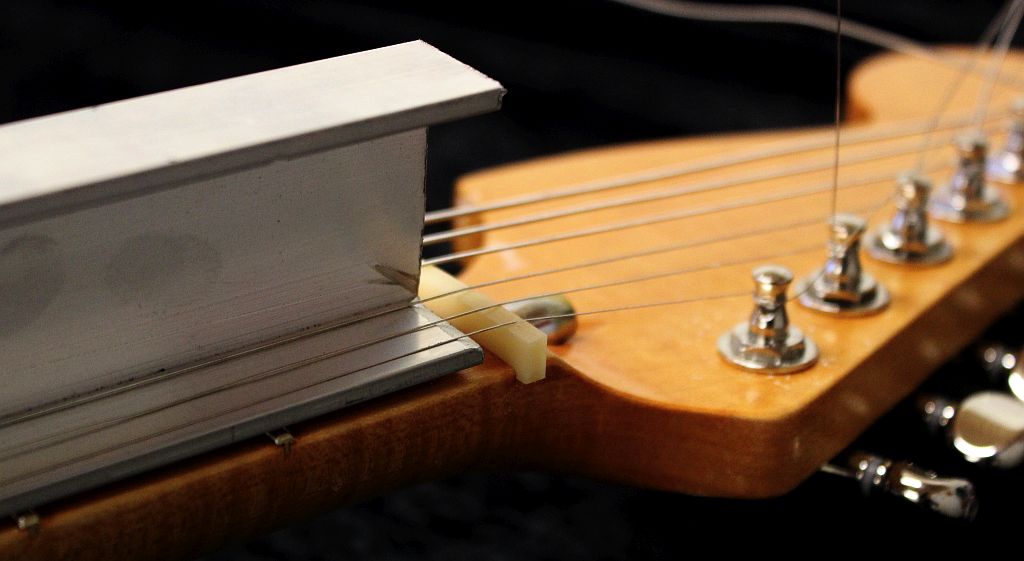
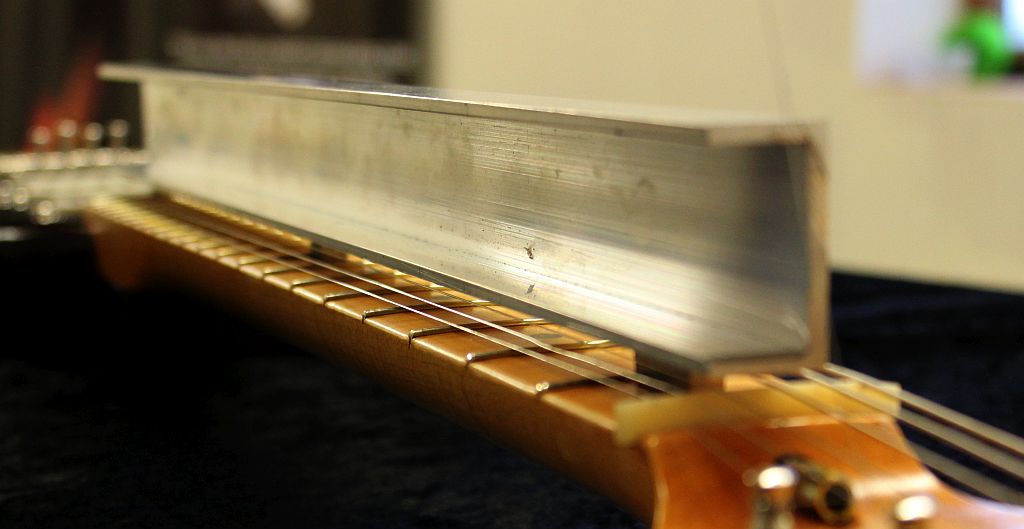
    If you are not sure why having the neck under string tension is important for this critical task, look up Leonhard Euler. He knew that materials under tension curve differently. This is why necks often have an s curve under tension and also a bit of a hump around the 14th – 18th frets. Using this tool you will be able to simply jig the guitar under real string tension and so compensate for these variations and level the frets accurately every time.

    The Wudtone UTFL comes with :

    • Precision Ground/Lapped Aluminium levelling beam 500mm x 38mm x 19mm and with 3mm thickness flanges that will not flex
    • Precision Steel gauge blocks
    • High quality, self adhesive, 400 grit, non clogging, Aluminium Oxide sanding paper

    We cover and practice the use of this tool during the Wudtone Luthier Performance Clinics.

    The steps are :

    • Tune up to pitch with the strings raised at the nut (this can be done using a nut that hasn’t yet had its slots cut or by placing a spacer. e.g. a pencil under the strings in front of the nut)
    • Clamp the guitar whilst using the precision steel gauge blocks, non paper covered flange of the levelling beam until the neck is straight.
    • Slide the abrasive paper covered flange under the each string, moving across the fretboard and sand with a slight diagonal motion until all frets are level. ( It helps to apply some permanent  ink marker to the frets so you can see exactly when you made contact, how much you have levelled every fret).

    Check out our other unique luthier tools to help you, re-crown and shape frets end, cut nuts most cost effectively.

    0reaction image LOL 0reaction image Wow! 0reaction image Wisdom
  • Looks interesting - would this work OK on a guitar without a truss rod and an aluminium neck?
    0reaction image LOL 0reaction image Wow! 0reaction image Wisdom
  • andypwudtoneandypwudtone Frets: 287
    edited November 2015
    Hi @BloodEagle as long as you can clamp the guitar to a desk or bench making sure the neck is straight using the steel gauge blocks, no problem.

    We usually have one clamp at the end of the body and then a clamp at the headstock end. Once tuned up, the headstock usually just needs pulling down a few mm ( to deal with any relief) to get it in the correct position to use the levelling beam. We use with spacers (eg piece of sloping wood,  business cards etc) underneath the headstock to get to the dead straight position and also clamped firm so there is no chance of any movement when sanding the frets level.

    Its a good idea to apply some permanent marker on to the top of the frets so you can see how things develop. Generally you will find most comes off the 14-18th fret,  if the guitar has had some play wear the last frets to get caught by the sanding will usually be around a D shape and the 5-8th ( seems A is a popular key ) . kind regards

    image  

    kind regards
    0reaction image LOL 0reaction image Wow! 0reaction image Wisdom
  • Hmmmm... I was just about to buy a straight edge for levelling as my current file is short but this seems quite intriguing.
    My muse is not a horse and art is not a race.
    0reaction image LOL 0reaction image Wow! 0reaction image Wisdom
  • martmart Frets: 5205
    That seems to be a bit cheaper than this source: http://www.ebay.co.uk/itm/TECHNOFRET-Advanced-Fret-Leveling-System-/180677811948
    But when I read what the Basschat folk say about it, I wonder if it really is so great:

    0reaction image LOL 0reaction image Wow! 0reaction image Wisdom
  • andypwudtoneandypwudtone Frets: 287
    edited November 2015
    @mart the Wudtone UTFL recognises the same science as the Technofret option and it is used in the same way. I would have thought there are folks here who can report on the experience with a Technofret system.  A couple of differences in what we are delivering though. The Technofret system comes with a separate bar to use with the spacers , ours doesn't as it really isn't needed because the levelling beam is straight itself and so can be used for that same purpose. 

    A key difference is the thickness of the flanges on our levelling beam at 3mm ( as opposed to only 1.58mm with the Technofret) and so this is a much stronger tool. It is a bit more tricky to get under the strings, (hence use a pencil under them , or do it before you cut the nut slots).

    I found the basschat thread a good laugh, largely hijacked by Vibrating G String,  an American from Californieeaah ,who loves spurting conspiracy theories more than reading posts, understanding science or product. I feel for the manufacturer having to defend. We had plenty of the same re the Wudtone CP tremolos a year or two back on various USA brand forums, they seem to have shut up now.
    kind regards 
    0reaction image LOL 0reaction image Wow! 1reaction image Wisdom
  • John_PJohn_P Frets: 2750
    I'm intrigued by this - it could be  a handy tool.   

    Could you explain a bit more about the stage where you get the neck straight before the sanding.  I'd have expected to use the truss to get it flat, but you if I read this correctly, you are keeping the strings and truss at tension and just pulling down on the head until it's straight and then holding it there while sanding?   
    0reaction image LOL 0reaction image Wow! 0reaction image Wisdom
  • andypwudtoneandypwudtone Frets: 287
    edited November 2015
    Hi @John_P , thank you. 
    You can use the truss rod to get it flat first ( and after levelling you then slacken to set the relief you want ). 

    That will work, but we prefer to use the clamp approach because the guitar is then firmly held as you do the sanding. Plus we just don't like having to over tighten truss rods any more than necessary. 

    So with the guitar strung up and tuned with an uncut nut or pencil in front of the nut etc to lift up the strings, you put the three precision steel gauge blocks on the neck, they slot in longways,  between the middle strings.

    Put the longest one between the nut  and 1st fret, next longest one between 7th and 8th frets and the shortest between the last two frets. 

    Then place the flange of the levelling beam which doesn't have any abrasive paper stuck to it on the gauge blocks. 

    Usually to start with ( depending on the amount of relief ) , you will have a v small gap between the middle gauge block and the beam. That is unless you have some bow in the neck to begin with. If so the truss rod may need to be slackened. 

    Use an led torch or something behind the gauge block /beam to see the gap. Then with some very fine adjustment of wood / tile spacers , credit / business cards etc slotted underneath the headstock,  and a G clamp , pull the headstock down and clamp firm until the gap between the middle gauge block /beam has gone but also there are no gaps at each end either. It usually only needs to be pulled down a few mm. In that position the guitar is held firm, neck is straight, but under string tension (so with all the fine s curve variations, humps etc the actual neck under string tension has) and you are ready to level the frets.

    It is easier with a Strat type guitar to jig spacers / clamp the headstock because there is no neck angle and your dealing with flat surfaces. Position the clamp aligned with the centre line of the neck so no chance of it twisting. 

    With a set guitar that has some neck angle you may need some spacer material underneath the front of the body so to position the headstock above the desk so you can pull it down and clamp. Place something below ( we use angled bits of wood etc) and above the headstock so you can clamp it without it slipping off or marking the headstock.   

    Let me know if you have any more questions.   

    kind regards


    0reaction image LOL 0reaction image Wow! 0reaction image Wisdom
  • John_PJohn_P Frets: 2750
    Thanks for the explanation and details - the idea of using added force from a clamp and pushing on the head of a les paul or prs to bend it straight is a bit scary though.   
    0reaction image LOL 0reaction image Wow! 0reaction image Wisdom
  • andypwudtoneandypwudtone Frets: 287
    edited November 2015
    Hi @John_P , your simply helping the truss rod, to counteract the force of the strings that are pulling the neck out of straight. The forces involved to straighten the neck are minimal , a light push with a finger. Try it with the guitar on its back , push the headstock and see what force is needed to move it a few mms. 

    As far as forces applied to the headstock, to clamp ( so to hold it from moving ), use good protection, don't over tighten so you don't mark any finish etc.

    kind regards 
    0reaction image LOL 0reaction image Wow! 0reaction image Wisdom
  • OilCityPickupsOilCityPickups Frets: 10388
    tFB Trader
    John_P said:
    Thanks for the explanation and details - the idea of using added force from a clamp and pushing on the head of a les paul or prs to bend it straight is a bit scary though.   
    That is exactly how the top repair men do setups ... it uses very little force 
    Professional pickup winder, horse-testpilot and recovering Chocolate Hobnob addict.
    Formerly TheGuitarWeasel ... Oil City Pickups  ... Oil City Blog 7 String.org profile and message  

    0reaction image LOL 0reaction image Wow! 0reaction image Wisdom
  • An important question I could find an answer to.  How much sandpaper do you get with the kit and do you sell replacement strips?

    BTW - My Wudtone CPV tremolo arrived today and it is a piece of art.  Won't be able to fit it for a few weeks but looking forward to putting it through it's paces.

    My muse is not a horse and art is not a race.
    0reaction image LOL 0reaction image Wow! 0reaction image Wisdom
  • Hi @randomhandclaps , thank you . 
    It comes pre loaded with 400 grit ( which should do at least 10 guitars), plus a 2nd replacement 400 grit strip. 

    It is non clogging but it may benefit from clean with de natured alcohol after 5-6 levels. 

    Yes we will do replacement strips in packs of four £1 each + p&p   
    kind regards

    0reaction image LOL 0reaction image Wow! 0reaction image Wisdom
  • Thanks for the info.

    My muse is not a horse and art is not a race.
    0reaction image LOL 0reaction image Wow! 0reaction image Wisdom
  • BigMonkaBigMonka Frets: 1771
    @andypwudtone has this been tried on an acoustic? Mine could do with a fret level from too many open chords, and although I've never done anything like it before, this tool looks like it would be do-able by a novice.
    Always be yourself! Unless you can be Batman, in which case always be Batman.
    My boss told me "dress for the job you want, not the job you have"... now I'm sat in a disciplinary meeting dressed as Batman.
    0reaction image LOL 0reaction image Wow! 0reaction image Wisdom
  • andypwudtoneandypwudtone Frets: 287
    edited April 2016
    HI @BigMonka , It will work fine as long as you use something ( eg a pencil) to lift the strings up at the nut end. It helps if you shape it a bit so sits better on the curve of the fretboard.  

    You will also need to clamp the guitar body, headstock until you counteract any relief so the neck is correctly set ready to have the frets levelled under string tension. 

    I would use plenty of protection and make sure the loads are spread over and onto the sides/edges  ( ie don't just use a g clamp on the top etc). As long as you take care holding the guitar / neck , using the tool to tget the frets accurately levelled will be easy.  I would apply some nobo board marker on the frets so you can see progress as you go . 

    Let me know if you have any more q's
    kind regards
    0reaction image LOL 0reaction image Wow! 0reaction image Wisdom
Sign In or Register to comment.