Fender Telecaster refinishing suggestions
What's Hot
MiddaparkaMiddaparka Frets: 1
edited January 2023 in Making & Modding

I recently picked up a cheap Fender Telecaster Player that someone had attempted to relic, hence the low price. It plays nicely, so I was going to keep it as-is, but the edges where the poly finish had been broken kept catching on clothing, so I thought I’d have a go at refinishing it.


So far I’ve removed the poly coating using a heat gun, so I’ll soon begin sanding to remove the remaining sealant and to try and at least minimise the gouges around the edges. As a bonus, I have ME/CFS (yay me!), so the sanding stage is going to take me a while, but at least it gives me time to think about the best way to finish it.
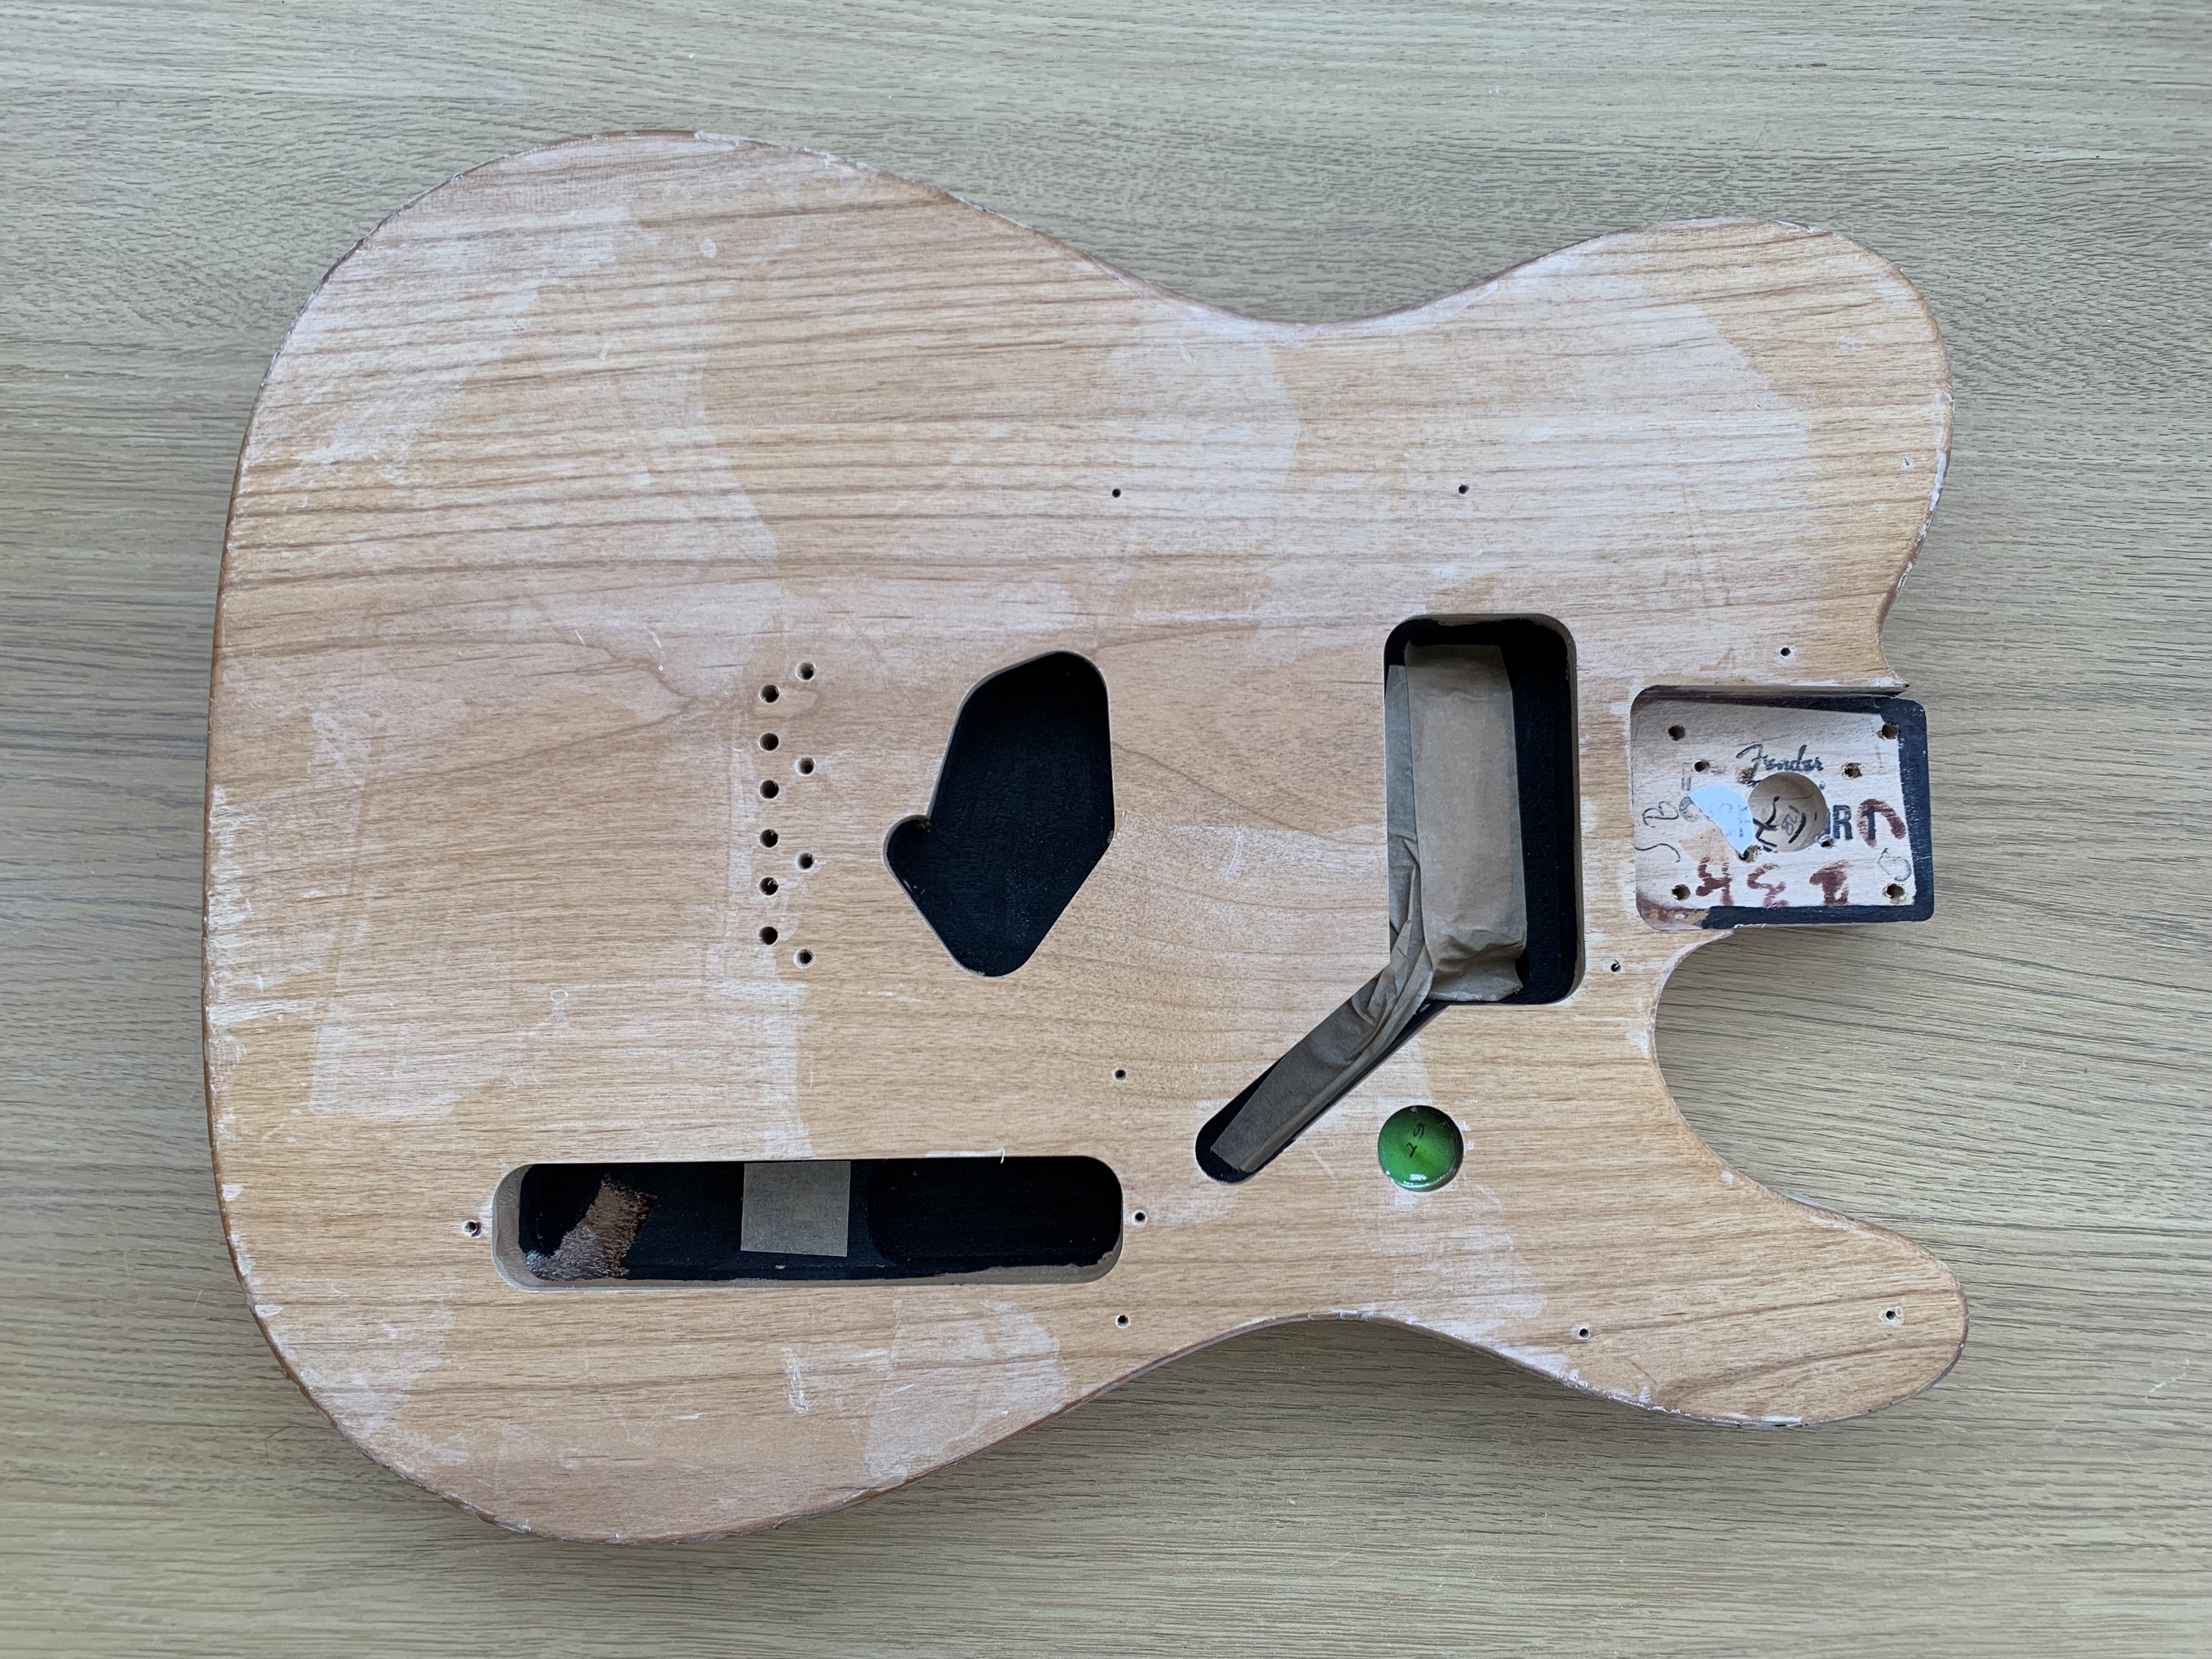

And… that’s where I’m getting a bit lost. I’ve had a good read of the various posts on here (although some of the older ones are suffering from image link rot) but it’s hard to get a sense of what the best option is likely to be. I’d ideally like to avoid anything too toxic both from a safety and environmental perspective, so a water or oil based approach seems like a sensible route. (Manchester Guitar Tech’s sonic blue nitro rattle cans and a vapour mask are tempting me though.)

Getting to the point, does anyone have any advice or suggestions for water or oil based approaches?  Also, due to my ME/CFS anything that I can do in small, isolated chunks (ideally ~30 mins) over a period of days/weeks would be more realistic.

0reaction image LOL 0reaction image Wow! 0reaction image Wisdom
«1

Comments

  • barnstormbarnstorm Frets: 705
    How slick a finish are you aiming for?
    0reaction image LOL 0reaction image Wow! 0reaction image Wisdom
  • MiddaparkaMiddaparka Frets: 1
    edited January 2023
    barnstorm said:
    How slick a finish are you aiming for?
    I'm not worried about a "shop" level of finish, as long as it's a reasonably solid protective coating I'll be happy.

    Of course, in an ideal world, I think a sonic blue colour would go well with the maple neck, but I’m happy to stain the body darker if that’s likely to be a more realistic goal.
    0reaction image LOL 0reaction image Wow! 0reaction image Wisdom
  • barnstormbarnstorm Frets: 705
    Well, FWIW, some thoughts on my recent experience with this stuff https://fusionmineralpaint.com/all-colours/#Classic, having not been able to find any write-up myself from anyone refinishing a guitar.

    The objective in my case was to refinish a cheap, used body as a blank canvas for a four-year-old to scribble on with Posca pens. Wasn't prepared to spend a lot of money; wasn't prepared to deal with anything I couldn't apply, maskless, at the kitchen table; wasn't prepared to wait ages between coats.

    Popped the poly off, which was easily the worst bit of the job. Kudos to whoever makes that stuff for Fender. It wasn't applied thickly at all, and it laughed in the face of the lower of the two settings on my heat gun.

    Had read that Fusion goes a long way, but ordered two tester pots (£4.99 each) to be on the safe side. I only got through as much paint as I did (1.5 pots) because I experimented a bit with different application techniques and then sanded back.

    A fussier and more patient painter could get the job done with very minimal brush marks (on the front and back, at least), but I didn't worry too much – partly because I didn't mind if the end effect was a little rustic ('Casement' white on a Tele body) and partly because I was always going to sand, which most furniture 'restorer' types who use Fusion do not.

    Pros and cons of the paint in use
    – No nasties, and not even a smell to deal with.

    – No primer needed.

    – It goes on very smoothly and it dries seriously quickly. Fusion says 21 days for the paint to fully cure and 'be at its toughest', but I was able to apply another coat within 10-15 minutes. The main advantage for me, though, was that I could flip the body over to paint the other side without having to worry about it sticking to the table! (Note that I was applying it thinly, but I can't see why you'd want to do anything else.)

    The issue with the quick drying time is that if you try to pull the paint around after your initial few brush strokes, you will leave marks. Also sensible to only pour paint out of the pot into your palette a little bit at a time.

    – It doesn't sand in the way I expected. Whether you leave it hours or days, it mostly comes off in tiny little rolls. Not bad thing since it means the process is less dusty than it might otherwise be, but you do have to watch out that the paper doesn't clog too much, because you can end up putting a dirty-looking smear across a light-coloured finish. (It'll sand right off with a fresh bit of paper, but easier not to make the mark in the first place.)

    – I think I ended up doing three coats and sanding back by hand twice (in each case the sanding probably took me half an hour) to the point where l was seeing the odd little patch of bare wood in an area where I'd been too enthusiastic. The third coat got a going-over with whatever high grit paper I had in the drawer. The nicest thing about the end result is how soft it feels.

    The biggest difficulty, which I assume is the case with any coloured finish applied with a brush, is doing the sides without (a) leaving more obvious brush marks in the cutaway and (b) ending up with a thicker layer of paint around the perimeter of the front and back. Painting and sanding the cutaway was annoying, but I'm happy with the result for my purposes.

    There are a couple of areas on the edges where my sanding left wood peeping through, but you get away with that look on a Tele – and particularly on one that will at some point be returned to me covered in scribbles!

    I've got some of Fusion's Tough Coat (described as a 'non-yellowing, water-based, wipe-on sealer', available in matte or gloss) but haven't experimented with it yet. I only bought it to seal the eventual 'artwork'; the Fusion paint seems tough enough on its own for use on a guitar (they claim it has a top coat 'built into the formula').

    I would not recommend it to the average person on here interested in refinishing a guitar, but it's a good option if totally hassle-free application and the ability to do the job in very short bursts trumps your need for a professional-looking finish. My guess is that darker colours are a bit more forgiving in use, too.
    0reaction image LOL 0reaction image Wow! 1reaction image Wisdom
  • droflufdrofluf Frets: 4211
    I did something similar in the summer but opted for a natural finish. A “build” thread here https://www.thefretboard.co.uk/discussion/233558/stripping-a-baja-2022-version#latest

    To get over the sides problem @barnstorm mentioned I put a
    Trading feedback thread:https://www.thefretboard.co.uk/discussion/172761/drofluf

    Sporky: "Drofluf is a reverse vampire, who always appears in mirrors."
    0reaction image LOL 0reaction image Wow! 1reaction image Wisdom
  • paulnb57paulnb57 Frets: 3222
    If it were mine I think I would prep it best I can and give it a few coats of Tru Oil, or Liberon Easy FrenchPolish possibly stain first, with your limitations, I think that would work well and could be done as and when you are able
    Stranger from another planet welcome to our hole - Just strap on your guitar and we'll play some rock 'n' roll

    0reaction image LOL 0reaction image Wow! 1reaction image Wisdom
  • droflufdrofluf Frets: 4211
    paulnb57 said:
    If it were mine I think I would prep it best I can and give it a few coats of Tru Oil, or Liberon Easy FrenchPolish possibly stain first, with your limitations, I think that would work well and could be done as and when you are able
    This. Plus there’s some nice wood there that it would be a shame to hide!
    Trading feedback thread:https://www.thefretboard.co.uk/discussion/172761/drofluf

    Sporky: "Drofluf is a reverse vampire, who always appears in mirrors."
    0reaction image LOL 0reaction image Wow! 1reaction image Wisdom
  • @barnstorm Thanks for the incredibly detailed write-up.  =) 

    I've had a look at the Fusion paints you mentioned and there's some interesting looking options in there, although I suspect I'd 
    also need to add a layer or two of Tough Coat as I'm a bit of a clumsy git these days.

    I think I'll see what the body ends up looking like once I've finished the sanding, as the oil option mentioned by @drofluf (great thread!) and @paulnb57 might be the way to go if the body looks good.
    0reaction image LOL 0reaction image Wow! 0reaction image Wisdom
  • droflufdrofluf Frets: 4211
    @Middaparka the areas I found hardest (or wish I’d done a better job on :) ) were in the cutaway and round the ferrules on the back. Although I notice you were braver than me and removed them. 
    Trading feedback thread:https://www.thefretboard.co.uk/discussion/172761/drofluf

    Sporky: "Drofluf is a reverse vampire, who always appears in mirrors."
    0reaction image LOL 0reaction image Wow! 0reaction image Wisdom
  • drofluf said:
    @Middaparka the areas I found hardest (or wish I’d done a better job on :) ) were in the cutaway and round the ferrules on the back. Although I notice you were braver than me and removed them. 
    Yeah, removing the poly around the cutaways with the heat gun was a world of fun - I’ve some sanding blocks with a curved edge on them that I’m hoping will help during the next stage of things, otherwise I can see me wrapping some sandpaper around a marker pen.  =)

    In terms of the ferrules, it was pretty easy - you can gently ease them out from the front through the string holes using an awl, although a blunt micro screwdriver might do the job if you’re careful.
    0reaction image LOL 0reaction image Wow! 0reaction image Wisdom
  • impmannimpmann Frets: 12766
    I’ve had great success using a stain from Crimson Guitars and then Tru Oil over the top. It’s lasted very well too - the guitar has had a hard life as a workshop hack and test guitar, and it’s not gone downhill 


    Never Ever Bloody Anything Ever.

    0reaction image LOL 2reaction image Wow! 0reaction image Wisdom
  • impmann said:
    I’ve had great success using a stain from Crimson Guitars and then Tru Oil over the top.
    Damn - that’s nice. The stain is a lot more effective than I imagined it would be.

    Did you rub back between coats of the stain? (I’m guessing there’s a few coats on there.)
    0reaction image LOL 0reaction image Wow! 0reaction image Wisdom
  • impmannimpmann Frets: 12766
    impmann said:
    I’ve had great success using a stain from Crimson Guitars and then Tru Oil over the top.
    Damn - that’s nice. The stain is a lot more effective than I imagined it would be.

    Did you rub back between coats of the stain? (I’m guessing there’s a few coats on there.)
    Nope - that was two wipe overs. The trick is to ensure that there is no sealer coat left and its nicely tinted/absorbed.

    There were a few coats of Tru Oil and I knocked the coats back between a couple of layers. What I did do was apply the first coat fairly thinly, let that dry and then applied a similar one, before doing any 'hi build' layers, in case the oil lifted the stain any.

    Hope that helps
    Never Ever Bloody Anything Ever.

    0reaction image LOL 0reaction image Wow! 1reaction image Wisdom
  • If you wanted to keep it natural here's mine. Originally a butterscotch (plastic!) Baja tele. Stripped, oiled and waxed...


    0reaction image LOL 3reaction image Wow! 0reaction image Wisdom
  • If you wanted to keep it natural here's mine. Originally a butterscotch (plastic!) Baja tele. Stripped, oiled and waxed...
    Ooo… another nice one.  =)

    I’m guessing that’s ash, so I can’t see the alder looking quite as nice, but even so.

    Hmm… I might have to pick up a black scratch plate. 
    0reaction image LOL 0reaction image Wow! 0reaction image Wisdom
  • rze99rze99 Frets: 2504
    If you wanted to keep it natural here's mine. Originally a butterscotch (plastic!) Baja tele. Stripped, oiled and waxed...


    did same with a  roadworn
    0reaction image LOL 0reaction image Wow! 0reaction image Wisdom
  • If you wanted to keep it natural here's mine. Originally a butterscotch (plastic!) Baja tele. Stripped, oiled and waxed...
    Ooo… another nice one.  =)

    I’m guessing that’s ash, so I can’t see the alder looking quite as nice, but even so.

    Hmm… I might have to pick up a black scratch plate. 
    Yes it's a 2 piece ash body. Oiling and waxing is definitely the easiest way to finish imo. I used a Fiddes wax with a slight dark tint in it (stripped pine?) to really bring out the grain.
    0reaction image LOL 0reaction image Wow! 1reaction image Wisdom
  • Yes it's a 2 piece ash body. Oiling and waxing is definitely the easiest way to finish imo. I used a Fiddes wax with a slight dark tint in it (stripped pine?) to really bring out the grain.
    Since your previous comment I’ve ordered a black scratch plate, so as long as the sanding phase goes well, I’m going to go down the oil and wax route.

    Just need to get started on the sanding when energy levels allow.  =)
    0reaction image LOL 0reaction image Wow! 0reaction image Wisdom
  • Yes it's a 2 piece ash body. Oiling and waxing is definitely the easiest way to finish imo. I used a Fiddes wax with a slight dark tint in it (stripped pine?) to really bring out the grain.
    Since your previous comment I’ve ordered a black scratch plate, so as long as the sanding phase goes well, I’m going to go down the oil and wax route.

    Just need to get started on the sanding when energy levels allow.  =)
    Nice one! Good luck :+1: 

    0reaction image LOL 0reaction image Wow! 0reaction image Wisdom
  • droflufdrofluf Frets: 4211
    Yes it's a 2 piece ash body. Oiling and waxing is definitely the easiest way to finish imo. I used a Fiddes wax with a slight dark tint in it (stripped pine?) to really bring out the grain.
    Since your previous comment I’ve ordered a black scratch plate, so as long as the sanding phase goes well, I’m going to go down the oil and wax route.

    Just need to get started on the sanding when energy levels allow.  =)
    Good call! Think it will look great. 
    Trading feedback thread:https://www.thefretboard.co.uk/discussion/172761/drofluf

    Sporky: "Drofluf is a reverse vampire, who always appears in mirrors."
    0reaction image LOL 0reaction image Wow! 0reaction image Wisdom
  • @lovestrat74 @drofluf Cheers. 

    I’ll create a new thread as the build progresses, or perhaps just update this one. 
    0reaction image LOL 0reaction image Wow! 0reaction image Wisdom
Sign In or Register to comment.