
Howdy, Stranger!
It looks like you're new here. If you want to get involved, click one of these buttons!
Categories
- 244.3K All Categories
- 22 >> Start Here <<
- 12 New Members
- 8 FAQs
- 87.5K Gear
- 39.9K Guitar
- 3.5K Acoustics
- 1.3K Bass
- 14.8K Amps
- 17.4K FX
- 304 Digital & Modelling
- 771 Other Instruments
- 8.3K Making & Modding
- 426 Gear Reviews
- 107 Guitar Reviews
- 74 Amp Reviews
- 119 FX Reviews
- 87 Other Reviews
- 751 Made in the UK
- 977 Theory
- 1.9K Technique
- 2.2K Live
- 3.2K Studio & Recording
- 2.2K Making Music
- 226 Events
- 15 Guitar Show 2018
- 847 Plug My Stuff
- 106.4K Classifieds
- 41.6K Guitars £
- 2.9K Acoustics £
- 143 LH Guitars £
- 909 Basses £
- 10.7K Parts £
- 18.5K Amps £
- 34.4K FX £
- 2.8K Studio & Rec £
- 6.2K Misc £
- 466 Personnel
- 55.3K Chat
- 36.9K Off Topic
- 1.1K Tributes
- 6.6K Music
In this Discussion
Become a Subscriber!
Subscribe to our Patreon, and get image uploads with no ads on the site!
Nomad's Lap Steel Build - Completed
 Nomad
Frets: 549
Nomad
Frets: 549
Been thinking about making a lap steel for ages (months), and never got started other than drawing bits to get an idea of shapes and sizes. Finally got going with it today with some impetus provided by the 2016 challenge to build a slide instrument. Having already done some of the design, the first thing was to cut some wood...
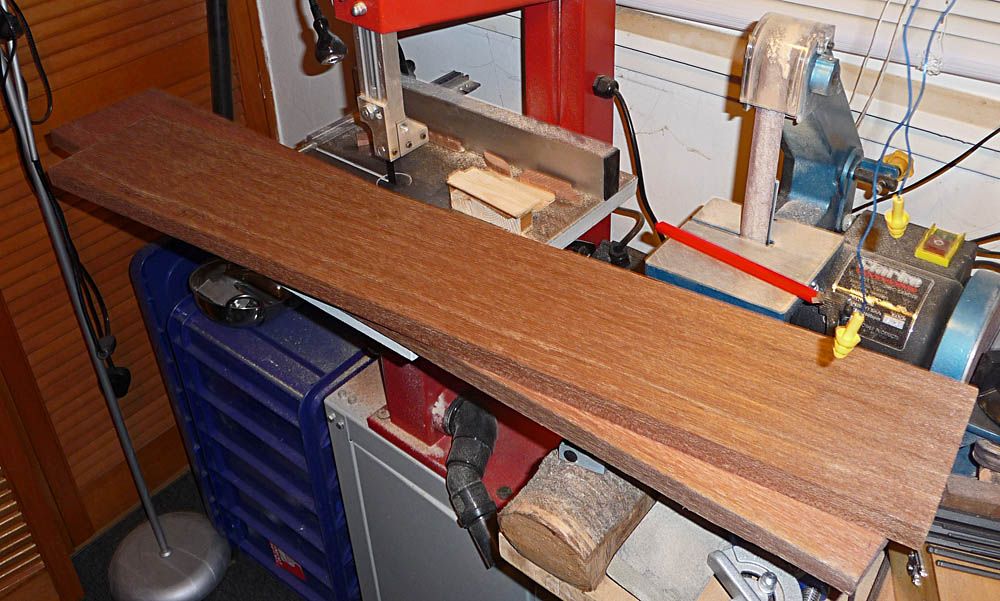
Two planks of meranti from the local wood place...
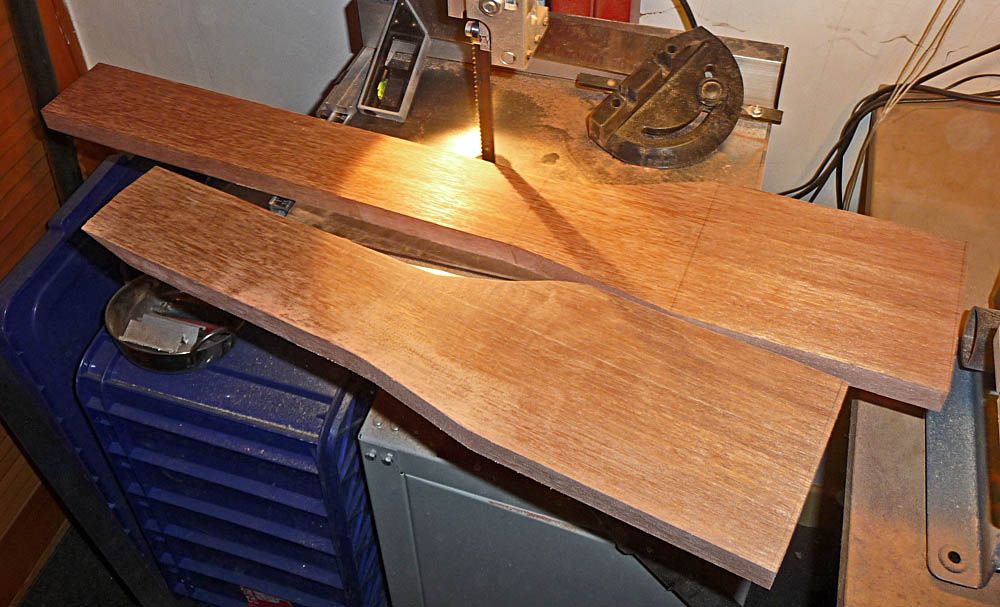
It's 145mm wide and 20mm thick. I originally bought 2.4m in total and cut it down to three bits, and these two had the most acceptable grain. Some marking out with ruler and pencil, and then some time on the bandsaw, and I had the two bits to make the body roughed out...
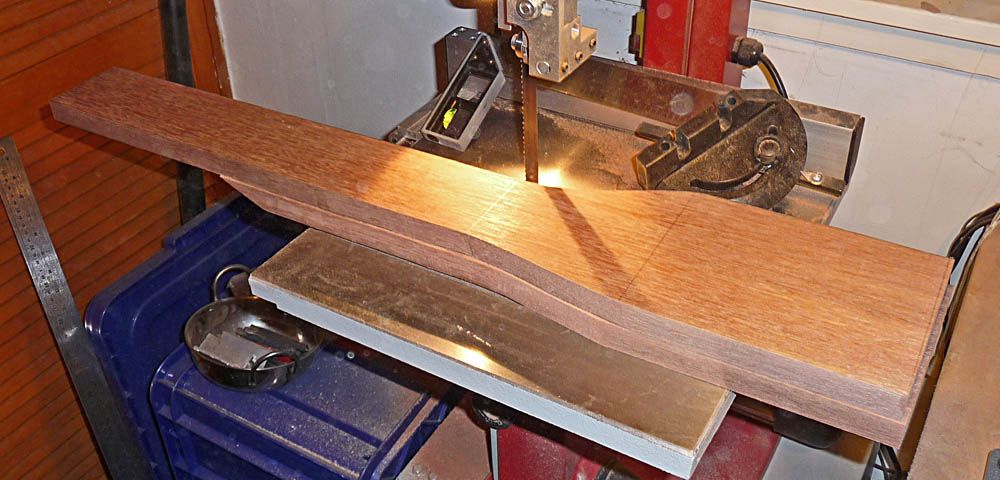
I marked out the top first, and then used that as a template for the bottom (shorter) bit. Stacked together to get an idea of the shape...
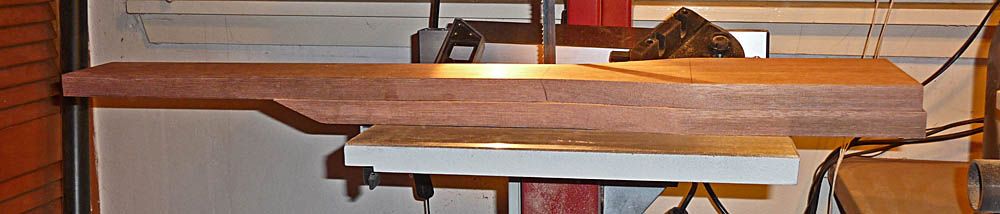
And a side view...
The thickness will be reduced to 15mm at the headstock end to work with the machine heads, and then the angled bit will be faired in.
The plan is to cut the cavity while the two planks are separate. Not sure how I'll approach this yet because I'm not set up to do routing. I should be able to do the cutting on my milling machine, or just drill through and use a scroll saw. I'll experiment with some offcuts and see what I prefer.
Costs
Meranti planks: £8
Total: £8
Nomad
Nobody loves me but my mother... and she could be jivin' too...
 LOL 1
LOL 1 Wow! 0
 Wisdom
 Base theme by DesignModo & ported to Powered by Vanilla by Chris Ireland, modified by the "theFB" team.
Comments
Did a test using the milling machine to make a cavity...
http://i1279.photobucket.com/albums/y521/Nomad_Zamani/Lap%20Steel%20Build/Lap%20Steel%20Cavity%20Test%2001_zpssqm1tiya.jpg
This was done using an 8mm endmill, so the corners have a radius of 4mm. The flute length was maybe a little short to get all the way through - motion felt a bit restricted. The parts that have a bottom are 19mm deep, and the cutting felt fine at that depth. Lots of dust, so I held the nozzle of the vacuum next to the cutter which made it pretty easy to see what was happening.
The top edge is left a little ragged, but cleans up fine with a bit of picking and sanding. The right-angled corner in the L-shaped cavity is as it cut. The second face was cut coming out towards the first, and a small bit of wood broke away as the cutter came through. I stopped the machine and picked it off - just a few fibres holding it on, and the edge hasn't been tidied up in any way.
It's probably not as quick as a router, but it's certainly quick enough. With that cutter, for the cavity I have in mind, I'd guess an hour or so. A couple of advantages of using a milling machine is that you get very good control over the position of the cutter because the job is clamped to an XY table that's moved using leadscrews. The nature of that is that you also get inherently good straight lines - the orthogonal accuracy is excellent. It's also quite a benign machine to use - it's relatively quiet, which means you can hear how the cut is going (eg, you know when you're trying to cut too much), and you can feel the cutting forces as feedback in the leadscrews. At any point, if you think something is wrong, you simply stop moving the XY table and the forces are all taken away.
Much easier to be precise with this than a scroll saw, so I think this is the method I'll be using.
Back to the drawing board to work out what the real cavity will look like...
Nomad
Nobody loves me but my mother... and she could be jivin' too...
Decided the two bits are straight enough for government work, and since I don't need to go through the top layer, now that the mill will be used for the cavity, I decided it was time to...
http://i1279.photobucket.com/albums/y521/Nomad_Zamani/Lap%20Steel%20Build/Lap%20Steel%20Body%2005_zps2pjuggjx.jpg
If there are any clamps missing, it's because I don't know where they are. There's a slight lack of oozage at the left-hand corner, but that's going to be radiussed, which will cut into the glue layer.
Nomad
Nobody loves me but my mother... and she could be jivin' too...
Made the pickup today. It uses Tele bridge pickup flatwork, Alnico 2 magnets, and 9000 turns of 42 gauge wire. DC resistance is about 6.6K. I'm hoping this will give a slightly mellower sound than a standard Tele pickup, but I'll have to wait until the guitar is built to find out.
One of the fiddly parts of this is getting the magnets fitted into the flatwork. The holes in the latter are a bit smaller than the magnet diameter (4.7mm compared to 5.03mm, roughly), so they need to be opened out a bit. The trouble with opening them out is that it's quite easy to lose the friction that keeps the bits held together. By the time I was done, some of the magnets were more of a slide fit than a friction fit, so I just let the two bits of flatwork come together and then placed the assembly in a small vice (gently nipped up - not tight), and then separated the flatwork to the ends of the magnets...
http://i1279.photobucket.com/albums/y521/Nomad_Zamani/Lap%20Steel%20Build/Lap%20Steel%20Pickup%2001_zpsyrowyhqy.jpg
To help keep things together, I applied a liberal coating of acrylic paint...
http://i1279.photobucket.com/albums/y521/Nomad_Zamani/Lap%20Steel%20Build/Lap%20Steel%20Pickup%2002_zpswvd2gqeo.jpg
The paint is over the magnets as well to reduce the chance of any damaged insulation on the wire making a contact resulting in shorted turns. With that dried off, I stuck it into my home-brew pickup winder, spun it 9033 times, and did some soldering...
http://i1279.photobucket.com/albums/y521/Nomad_Zamani/Lap%20Steel%20Build/Lap%20Steel%20Pickup%2003_zpsodzruclk.jpg
I then bunged it into a pot of wax in a pot of hot water and waggled it about for a few minutes until the bubbles that can be seen here stopped appearing...
http://i1279.photobucket.com/albums/y521/Nomad_Zamani/Lap%20Steel%20Build/Lap%20Steel%20Pickup%2004_zpsd00jnke4.jpg
The blue marks are to indicate which pole of the magnet is which - check them all before assembly (with a little compass) and mark them so that they all go in the right way when things are put together. The pottng took a bit less time than I expected (hadn't potted a pickup before). I thought it would take about 15 minutes, but it was more like 5 or 6. I then took it out, gave it a shake, and left it to drain and cool on a paper towel, before adding some cloth wrapping tape and fitting it to a baseplate...
http://i1279.photobucket.com/albums/y521/Nomad_Zamani/Lap%20Steel%20Build/Lap%20Steel%20Pickup%2005_zpsdpjqlk5f.jpg
I'm rather pleased with that - it looks like a real one.
I also spent some time working up the design a bit more, and here's where it's got to...
http://i1279.photobucket.com/albums/y521/Nomad_Zamani/Lap%20Steel%20Build/Lap%20Steel%20Drawing%2001_zpsg89w5doh.jpg
Originally, the fretboard part was the same width as the widest part of the headstock, but I reduced it (to 60mm) when I found that fretboard blanks were hard to find in the wider size. The machine heads were also originally parallel to the centre line, but I wasn't keen on some of the angles the strings would have over the nut - the slight V arrangement makes these a bit more benign.
I also added in the fret positions, after using the calculator on the Stewmac web site, which was handy because it also gave the saddle distances for the 1st and 6th E strings - the angled line at the bridge position shows these. This will be very handy when it comes time to sort out the bridge.
Bits still to be done to the design are the nut and bridge, finalise the pickup/control cavity, and come up with a shape for the scratch plate. I'm also musing on whether the strings should be through-body or stop at the bridge, and on whether to get green abalone or MOP dot markers. I've ordered a rosewood fretboard blank (and some headstock veneer), so I'll see how that looks when it arrives
Costs
Meranti planks: £8
Pickup bits: £9
Rosewood bits: £13.45 (fretboard blank and headstock veneer)
Total: £30.45
Nomad
Nobody loves me but my mother... and she could be jivin' too...
The lathe and mill are the yin and yang of the metal workshop. My mill is a Seig X1, not dissimilar to this...
http://www.arceurotrade.co.uk/Catalogue/Machines-Accessories/Milling-Machines/Model-Super-X1L-Mill/SIEG-Super-X1L-Mill
Had mine a bit over 10 years, and it's been great. It's a surprisingly capable little machine.
Nomad
Nobody loves me but my mother... and she could be jivin' too...
would love a proper go on a lapsteel.
So would I, which is why I'm building this, really. I nearly bought one of the Harley Benton ones from Thomann last year, but did some searching and found out that it's made of plywood (and probably has a minging pickup), and I wasn't keen on the black painted finish (originally planned to strip and oil it). I decided I could probably make something a bit better. Never made a guitar before, and this should be easier than a normal one.
I'm sure there's a bit more to intonation than just the stretch resulting from fretting - something to do with the thicker strings being stiffer near the nut and saddle, resulting in less effective vibrating length. Moving the saddles back compensates for that. However, it does seem that the vast majority of lap steels have a perpendicular saddle, so I think I'll go with that - as a first attempt, I'm happy to not make things too complicated and follow convention to some extent.
I came up with a possible bridge design today, basically a flat plate screwed to the body, with a lump added onto the plate. If I really want to make a compensated version, I could always make a new lump.
Nomad
Nobody loves me but my mother... and she could be jivin' too...
The distance between slide/ string and fretmarker combined with your viewing angle make it not worth worrying about. The slide never looks like its in the right place, so you naturally learn to adjust.... And you know what, it always sounds better if its moving anyway.
Instagram
Nomad
Nobody loves me but my mother... and she could be jivin' too...
Try it, make 2 bridges
Instagram
Latest update. Haven't been doing much practical stuff with the lap steel apart from some marking out on the wood to indicate the positions of some of the main features, like the nut and machine head locations, headstock and fretboard outline, end of the fretboard and position of the pickup and bridge. I also made a 3D model of an initial bridge design today, and will have a mooch in the workshop to see what candidate materials (bits of brass) I have. Still need to do the nut and some sort of string puller-downer string tree thingy.
What I did do today was make a dust extractor for the micro-router, which is detailed in this thread...
http://www.thefretboard.co.uk/discussion/67065/rotary-tool-home-brew-add-ons
I'm looking forward to the rosewood headstock veneer arriving to see how it works on that. Interesting to see that the meranti is quite fibrous - maybe a higher speed will help with that.
Nomad
Nobody loves me but my mother... and she could be jivin' too...
The bits of rosewood arrived at the end of the week...
http://i1279.photobucket.com/albums/y521/Nomad_Zamani/Lap%20Steel%20Build/Lap%20Steel%20Body%2006_zps52ls4n9v.jpg
Too streaky for my taste, so they will be blacked using Fiebing's oil dye for leather. Here's a look at the edges to see the thickness...
http://i1279.photobucket.com/albums/y521/Nomad_Zamani/Lap%20Steel%20Build/Lap%20Steel%20Body%2007_zpsteiwm9qb.jpg
The fretboard is a bit over 9mm thick, and the headstock plate is just over 3mm. I cut the fretboard down to size (slightly oversize), and placed it on the body to get an idea of how things might look...
http://i1279.photobucket.com/albums/y521/Nomad_Zamani/Lap%20Steel%20Build/Lap%20Steel%20Body%2008_zpsgngbusvc.jpg
There's a lot more to be done with this - inlays, blacking, and something to show the fret positions (not planning to fit actual frets, but inlay something that contrasts, like light coloured hardwood).
In other news, I threw caution to the wind and invested in some high-class machine heads costing a massive £6.49, not each, but for all six. Don't let anyone tell you I'm a tight bastard. I also found the strings I bought for this ages ago. Also ordered the leather dye and some daubers, but will omit the cost of that until near the end and include it as an estimate of the finishing costs.
There isn't much more to be bought now - pots, knobs, socket, the inlay materials, and probably some sundry fixing hardware. Already have scratchplate material that has been kicking about for years, and I'm planning to make the bridge and nut from whatever I have lying around.
Costs
Meranti planks: £8
Pickup bits: £9
Rosewood bits: £13.45
Machine heads: £6.49
Strings: £5.60
Total: £42.54
Nomad
Nobody loves me but my mother... and she could be jivin' too...
After a diversion into making things for doing inlays, I've done a bit more to the body. Not much, but I mooched around in the workshop cupboards and found a lightweight router (550W) that I bought years ago and never used apart from a little trial. Found a longish bit with a bearing, clamped the body down and worked the oversize layer down to match the other, followed by a bit of sanding...
http://i1279.photobucket.com/albums/y521/Nomad_Zamani/Lap%20Steel%20Build/Lap%20Steel%20Body%2009_zpsywrhl2xs.jpg
http://i1279.photobucket.com/albums/y521/Nomad_Zamani/Lap%20Steel%20Build/Lap%20Steel%20Body%2010_zps6y3h9oyc.jpg
It wasn't nearly as aggressive as I thought it might be, although I think the machine struggled a bit where the overlap was larger (especially at the butt-end). I found that cutting up towards the surface seemed to work much better than cutting down (moving left to right with the edge towards me). I've got another cheapo router that I've also had for years (1000W), so I might give that a try some time, if I can find the tray of router fittings that seems to have vanished.
Anyway, here's the machine heads that arrived recently, as well as the mother of pearl bits...
http://i1279.photobucket.com/albums/y521/Nomad_Zamani/Lap%20Steel%20Build/Lap%20Steel%20Bits%2001_zpsf6vkzjf3.jpg
I got 20 4mm dots - need 16, so the extra is to give me some options in case I want to reject some. The big bit of MOP is 46x38mm and some of that will be used for the headstock logo. The smaller bit is just for practice with working the material (sawing, shaping, etc). I have an offcut of the rosewood, so I can try the full inlay process before committing to doing it on the instrument. I reckon I'll use no more than half of the big bit, so the MOP cost is estimated on that basis.
I've also been thinking a little about the finish. It'll be oiled, and I did some experimenting with mixing oil paint and linseed oil, but I wasn't keen on how it looked on the meranti. After making the wooden gadgets for working the inlays (also meranti), I'm leaning towards the same finish, which was just plain boiled linseed oil. There's still some scope to play around with this - I also have Tru-Oil, and maybe I could look into some dyes.
Costs
Meranti planks: £8
Pickup bits: £9
Rosewood bits: £13.45
Machine heads: £6.49
Strings: £5.60
Inlay bits: £8
Total: £50.54
Nomad
Nobody loves me but my mother... and she could be jivin' too...
Formerly TheGuitarWeasel ... Oil City Pickups ... Oil City Blog 7 String.org profile and message
I was looking on the Stewmac web site, and saw that he sells strong magnets for magnetising pickups or changing the polarity. Is this something to consider if I'm buying ready magnetised magnets? I'm wondering if it might result in more even flux between the individual poles. (I have no idea how consistent Cermag are, and they do a range of neodymiums at low cost.)
Nomad
Nobody loves me but my mother... and she could be jivin' too...
Formerly TheGuitarWeasel ... Oil City Pickups ... Oil City Blog 7 String.org profile and message
These look like a good bet...
http://www.cermagmagnets.co.uk/n38-neo-block---58mm-x-10mm-x-17mm--214kgs-pull-force---massive-holding-power-497-p.asp
Or maybe these for an 8-pole lap steel pickup (but less strength than the above)...
http://www.cermagmagnets.co.uk/n42sh-neo-block---80mm-x-6mm-x-5mm--102kgs-pull-force---high-temperature-456-p.asp
Should both magnets move inwards towards a pickup held in the centre, rather than stick the pickup on one magnet and move the other towards it? The latter could be done with a vice, but the former will need a thing to be invented (some sort of inny-outy criss-cross affair, methinks).
My last Cermag order was A2, A5 and something else, but I can't remember if it was A3 or A4 (they didn't have one in the size I was going for, but seem to list everything in every length now. I'll need to check when I get home.
Nomad
Nobody loves me but my mother... and she could be jivin' too...
Formerly TheGuitarWeasel ... Oil City Pickups ... Oil City Blog 7 String.org profile and message
No shortage of them.")
I'll get a couple of the chunky neodymium ones when I next order magnets.
Nomad
Nobody loves me but my mother... and she could be jivin' too...